
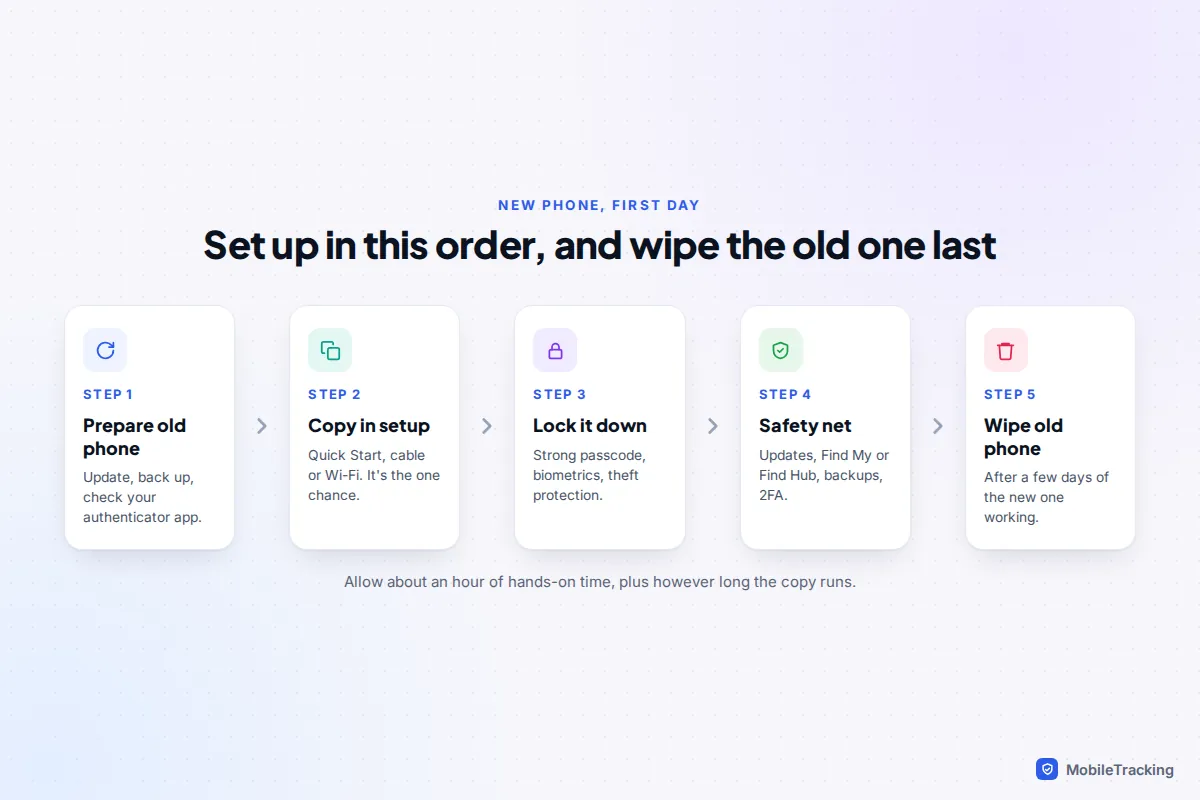
Set up a new phone in this order: bring your data across during setup, choose a strong passcode and add Face ID or a fingerprint, install updates, switch on Find My (iPhone) or Find Hub (Android) with theft protection, confirm backups are running, move and test your two-factor codes, add your emergency details, then review app permissions and notifications. Wipe the old phone last, and only after the new one has worked for a few days.
The order is not fussiness. The data copy can only happen during setup on most phones, theft protection depends on the passcode and Find My being in place, and the old phone is your only fallback until you have proved that sign-ins, chats and photos all made it.
Before you start: ten minutes on the old phone
Most first-day disasters start on the old phone. Before you switch the new one on:
- Update it. A current operating system on the old phone avoids version mismatches during the copy. On an iPhone, go to Settings › General › Software Update; on Android, Settings › System › Software updates (Samsung: Settings › Software update).
- Run a fresh backup. Even if you plan a direct copy, a backup from today is your insurance if the copy fails halfway.
- Check your authenticator app. Open it and find out whether it syncs to an account or needs exporting.
- Know your passwords. You will need your Apple Account or Google account password, and probably your email password. If you can’t recall them, reset them now while you can still receive codes on the old phone.
- Charge both phones and find a cable.
Bring your data across during setup
This is the step to get right first time. On Android, Google only restores app data, settings and messages during setup; skip it and the clean fix is a factory reset of the new phone. iPhones are similar: to migrate after finishing setup you have to erase the new iPhone and start again.
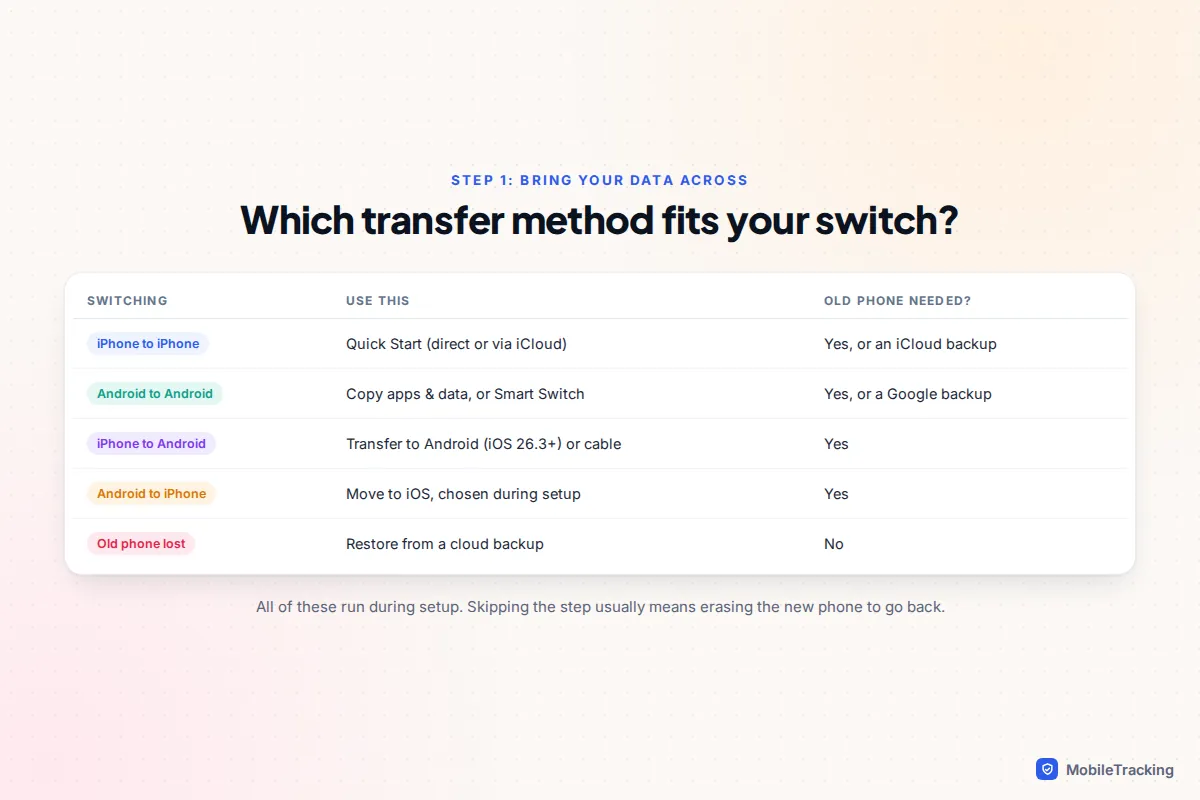
iPhone to iPhone: use Quick Start. Turn on the new iPhone next to your unlocked old one (it needs iOS 11 or later, with Wi-Fi and Bluetooth on), scan the animation, and enter your old passcode. Apple then offers two routes: downloading from iCloud, which lets you use the new phone straight away while apps and data arrive in the background, or transferring directly from the old iPhone, which ties up both phones until it finishes. Apple’s Quick Start instructions have the full flow.
Android to Android: when the new phone shows Copy apps & data, connect the old phone by USB-C cable or copy over Wi-Fi. Galaxy phones use Smart Switch, which you can also run later from Settings › Accounts and backup › Bring data from old device. Our guide to setting up a new Android from a backup walks through each screen, including moving an eSIM.
Switching platforms: since iOS 26.3, an iPhone can send data straight to a new Android phone from Settings › General › Transfer or Reset iPhone › Transfer to Android; Apple says the Android phone needs Android 17. Older Android phones use a cable or Google’s Android Switch app instead. Going the other way, choose From Android during iPhone setup and use Apple’s Move to iOS, which is built in on Android 17 and a free app on earlier versions.
If the old phone is lost or broken, restore from the cloud instead. Our guide to restoring a phone from a backup covers what comes back and what doesn’t.
Lock it down: passcode, biometrics and theft protection
A passcode worth having
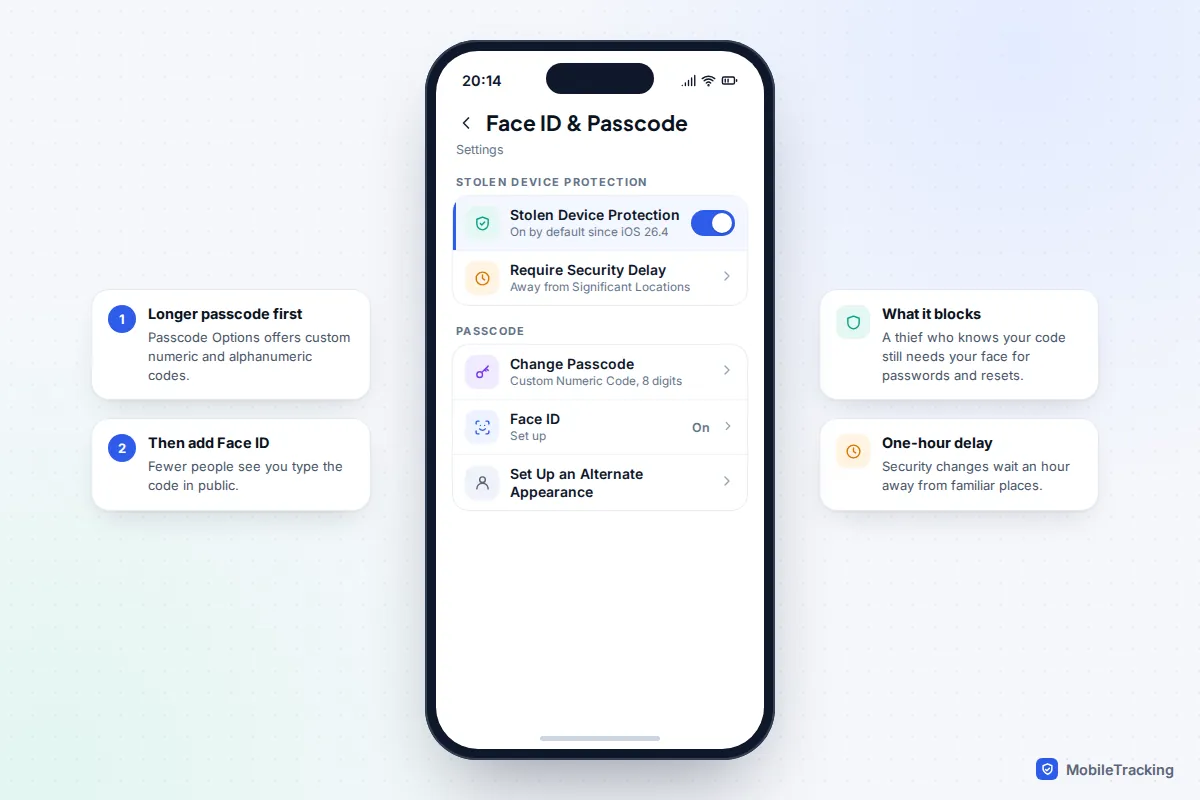
Setup asks for a screen lock early. Don’t reuse a four-digit code. Your passcode unlocks your saved passwords and, on an iPhone, can be used to change your Apple Account password. Thieves have learned to watch people type a code in a pub and then snatch the phone.
On an iPhone, tap Passcode Options when asked and choose Custom Numeric Code (aim for eight digits or more) or Custom Alphanumeric Code. On Android, choose a PIN of six or more digits or a password rather than a pattern, which leaves visible smudges. Avoid birthdays, repeated digits and 123456.
Face or fingerprint
Once the passcode is strong, add Face ID or a fingerprint so you rarely have to type it in public. That is the real security gain of biometrics: fewer people see your code. On Android, check whether your phone’s face unlock is the secure kind or only a camera match. Our guide to setting up face unlock safely explains the difference and how to disable biometrics quickly.
Stolen Device Protection on iPhone
Stolen Device Protection makes a thief who knows your passcode still need your face or fingerprint for sensitive actions, and adds a one-hour delay before security changes such as a new Apple Account password when you’re away from familiar places. Since iOS 26.4 it is on by default, but check it: Settings › Face ID & Passcode › Stolen Device Protection. It needs Find My and Significant Locations switched on to work.
Theft protection on Android
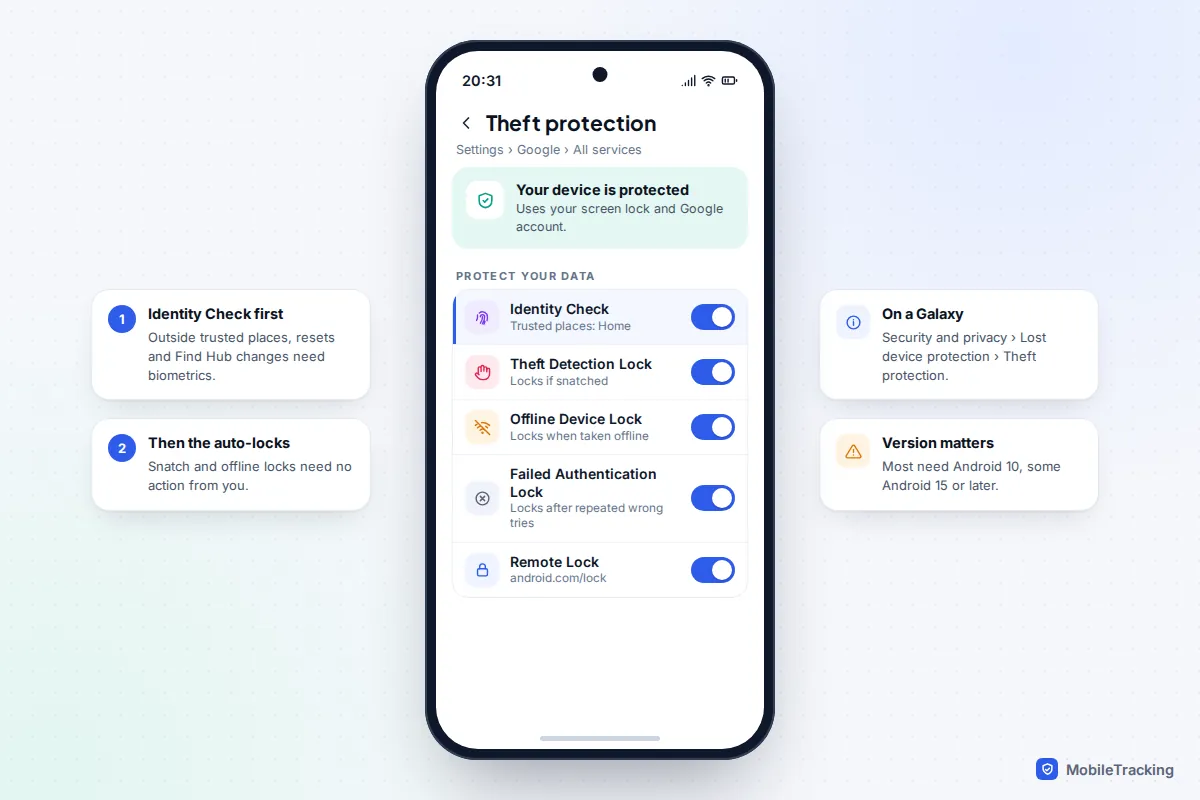
Google’s equivalent lives in Settings › Google › All services › Theft protection (on a Galaxy, Settings › Security and privacy › Lost device protection › Theft protection). Turn on Identity Check and add your trusted places such as home, so that outside them changing your screen lock, turning off Find Hub or factory resetting needs your biometrics. Also switch on Theft Detection Lock, which locks the screen if the phone is snatched, and Offline Device Lock, which locks it if a thief takes it offline. Google’s theft protection help page lists which features need Android 15 or later.
Updates, Find My and backups: your safety net
Install updates on day one
New phones often ship a version or two behind. Check straight after setup, then make it automatic. On an iPhone, go to Settings › General › Software Update › Automatic Updates and turn on both downloading and installing. On a Pixel, updates live in Settings › System › Software updates; on a Galaxy, Settings › Software update, where you can allow automatic downloads over Wi-Fi. Update your apps from the App Store or Play Store too, since restored apps can be old builds.
Make the phone findable
On an iPhone, open Settings › [your name] › Find My › Find My iPhone and make sure Find My iPhone, Find My network and Send Last Location are all on. On Android, Google’s Find My Device became Find Hub in 2025; check Settings › Google › All services › Find Hub and set Find your offline devices to one of the network options so the phone can be found even without a data connection. Galaxy phones also have Samsung’s own finder under Settings › Security and privacy › Lost device protection.
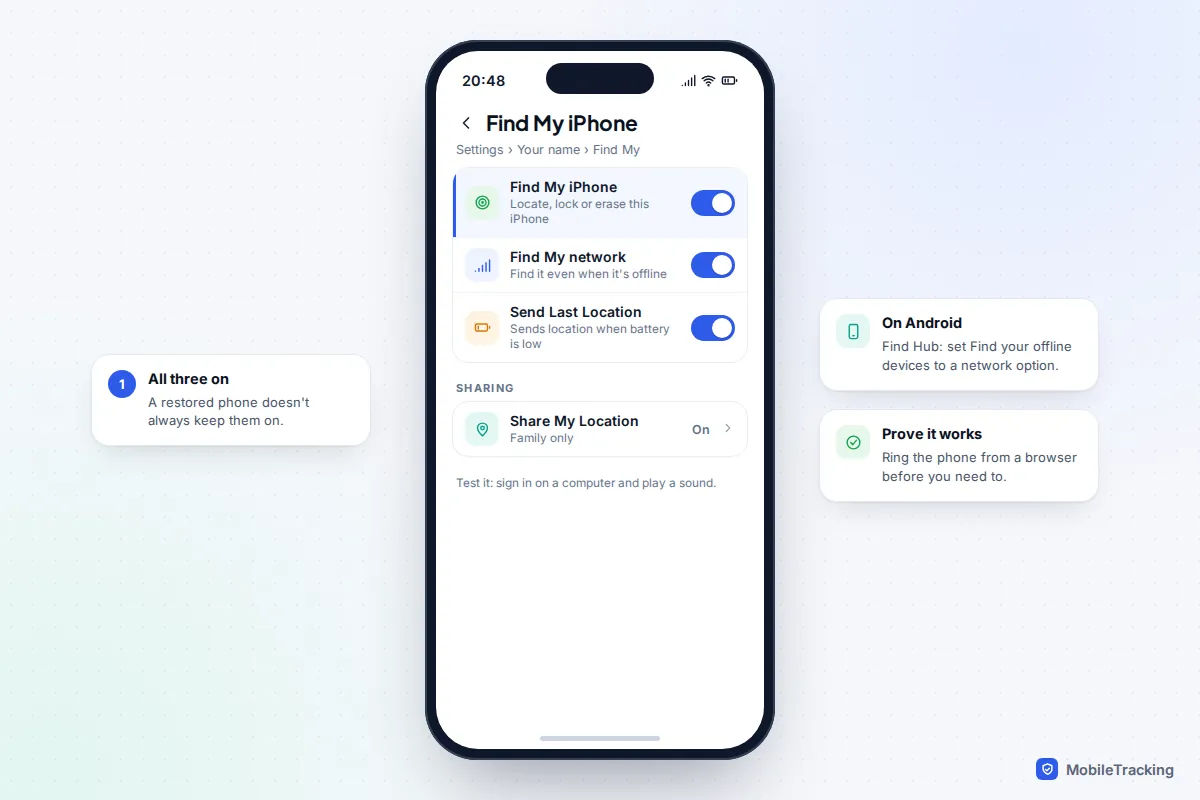
Then sign in to the Find My or Find Hub website on a computer and make the new phone ring. For each setting explained, see turning on Find My before you lose your phone.
Confirm backups are actually running
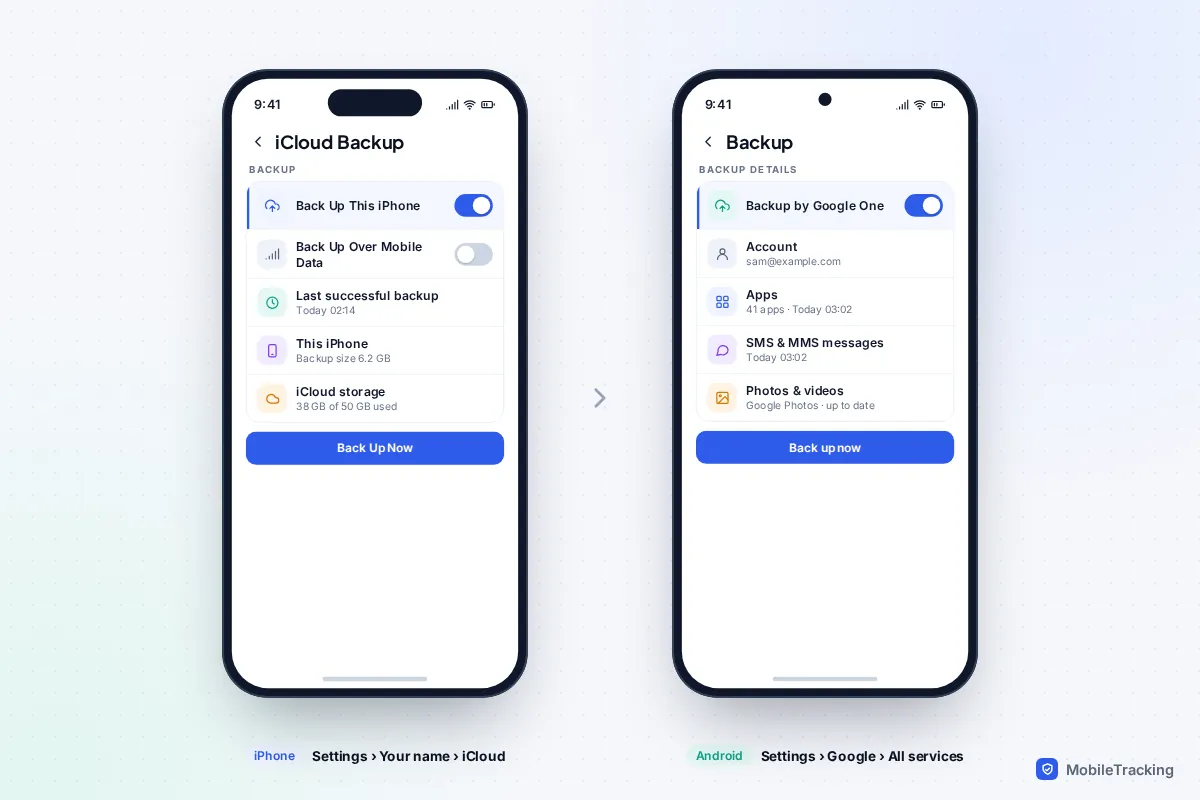
A restored phone doesn’t always carry the backup setting across. On an iPhone, check Settings › [your name] › iCloud › iCloud Backup and turn on Back Up This iPhone. On Android, open Settings › Google › All services › Backup and confirm backup is on and signed in to the right account. Check your photos separately: iCloud Photos on iPhone, backup in the Google Photos app on Android.
Watch the storage. iCloud’s free tier is 5 GB and Google’s is 15 GB shared with Gmail and Drive, so a full account quietly stops backups. Tomorrow, look again: the backup screen should show a time from last night.
Move your two-factor codes and test every sign-in
Your text messages follow your number, but codes in an authenticator app only move if you move them. How depends on the app:
- Google Authenticator: if you signed in to your Google account inside the app, your codes sync to the new phone when you sign in there. If not, use Transfer accounts › Export accounts on the old phone and scan the QR code with the new one.
- Microsoft Authenticator and similar apps: turn on the app’s cloud backup on the old phone first, then recover on the new one with the same account.
- Apple Passwords: verification codes stored in the Passwords app sync through iCloud Keychain, so they appear once you’re signed in with the same Apple Account.
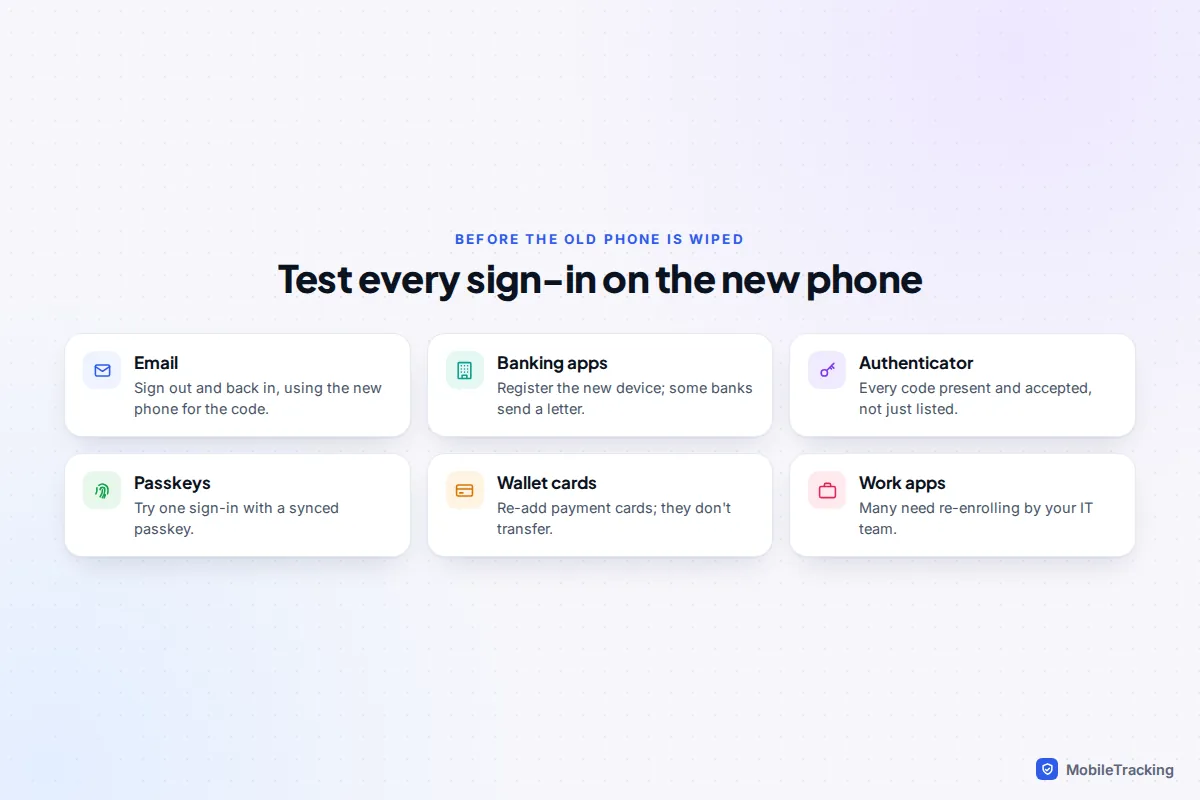
Now prove it. Sign out of and back in to your email, your bank and anything else important, using the new phone for the code. Banking apps usually treat a new phone as a new device and ask you to register again, sometimes with a card reader or a letter, so do this before you need to pay for something.
Emergency SOS and Medical ID: two minutes that matter
If you are ever hurt, your phone can call for help and tell paramedics what they need to know, but only if you set it up.
On an iPhone, open the Health app, tap your profile picture, then Medical ID › Edit. Add allergies, medication and conditions, add emergency contacts, and turn on Show When Locked so it can be read from the lock screen. Then check Settings › Emergency SOS, where you choose whether holding the side and volume buttons or pressing the side button five times calls emergency services.
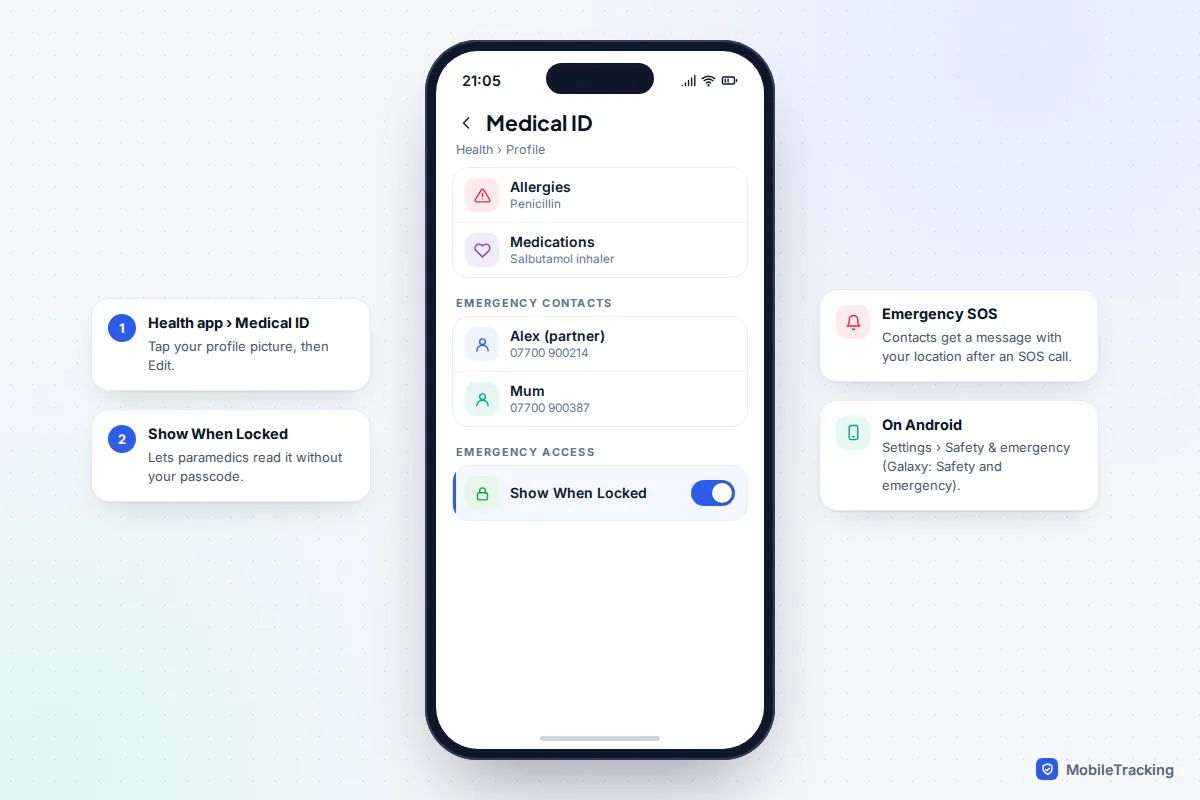
On a Pixel, go to Settings › Safety & emergency to add medical information and emergency contacts and to turn on Emergency SOS, which you trigger by pressing the power button five times. Galaxy phones have the same features under Settings › Safety and emergency. For a child’s phone, add both parents as emergency contacts.
Review permissions and tame notifications
A transferred phone inherits every permission you ever allowed, including for apps you forgot you had.
On an iPhone, Settings › Privacy & Security lists every permission type; start with Location Services, Photos, Microphone and Camera and downgrade anything that doesn’t need them to “While Using” or “Never”. Safety Check on the same screen shows who you share your location and data with. On Android, open Settings › Security & privacy › Privacy and use the privacy dashboard and permission manager; on a Galaxy, search Settings for “permission manager”.
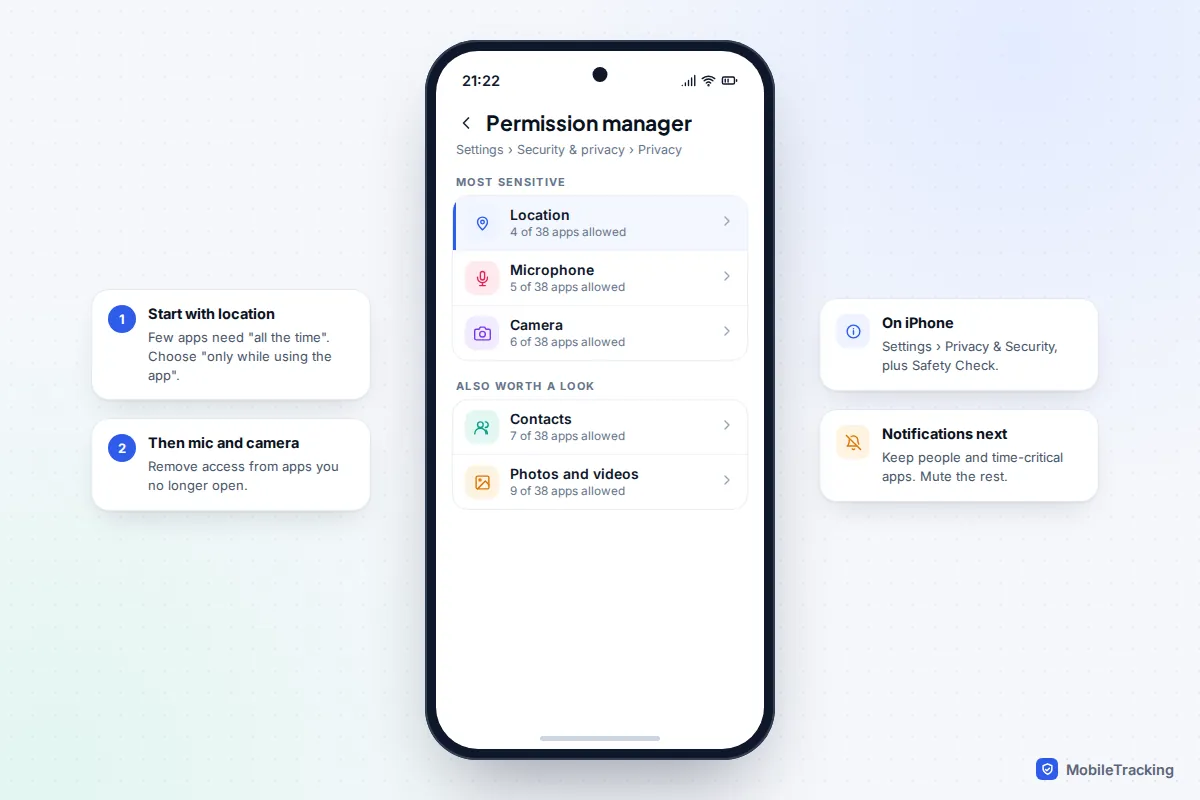
Notifications are next. The rule that keeps a phone calm is simple: allow notifications from people and from anything time-critical, such as your bank, deliveries and calendar, and switch off the rest. On an iPhone, adjust each app in Settings › Notifications, or move less urgent apps into Scheduled Summary. On Android, long-press any unwanted notification and turn it off, or use Settings › Notifications › App notifications.
Only now: wipe and prepare the old phone
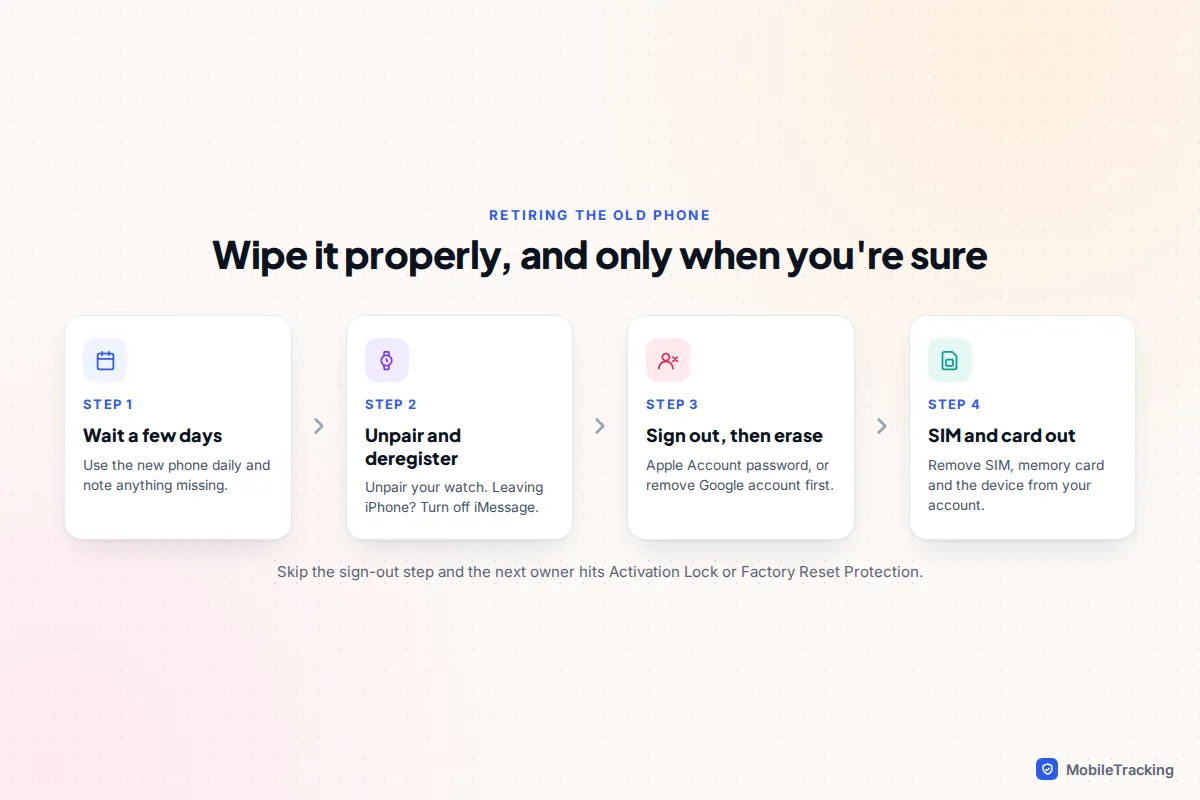
Give the new phone a few days to a week, so you spot anything missing while the old phone still has it. Then:
- Unpair any smartwatch from the old phone, and if you’re leaving iPhone for Android, turn off iMessage so texts from iPhone users reach your new phone.
- On an iPhone, go to Settings › General › Transfer or Reset iPhone › Erase All Content and Settings and enter your Apple Account password when asked. That removes Activation Lock so the next owner can use it.
- On Android, remove your Google account (and Samsung account on a Galaxy) first, then factory reset. Skip the account step and Factory Reset Protection will lock the next owner out.
- Take out any physical SIM and memory card, and remove the old phone from your account’s device list.
Our full guide to wiping a phone before selling it covers trade-in quirks and eSIMs.
The mistakes that cause most first-day problems
- Tapping “Set up as new” or “Don’t copy” to save time, then finding there is no easy way back.
- Resetting the old phone the same evening, before testing authenticator codes.
- Letting the new phone run out of power mid-transfer.
- Assuming backups are on because they were on the old phone.
Frequently asked questions
How long does setting up a new phone take?
The hands-on part of this checklist takes about an hour. The copy itself depends on how much data you have: Google says an iPhone-to-Android transfer usually takes under 30 minutes but can run to a few hours, and apps and photos may keep downloading in the background overnight.
I finished setup without copying my data. What now?
On a Galaxy, run Smart Switch from Settings at any time. On most other phones, the reliable fix is to erase the new phone and start setup again, which costs little if you’ve only had it a day.
Should I set up the new phone as new instead of restoring?
Only if you want a clean start and your important data already lives in the cloud (photos, contacts, email, passwords). You’ll lose app data, settings and message history that isn’t synced elsewhere, so check chats and authenticator codes first.
Do I need to do all this for my child’s new phone?
Yes, and a few steps matter more: a passcode your child can remember but others can’t guess, Medical ID with both parents as contacts, and Find My or Find Hub switched on and tested. Talk it through with them rather than doing it silently.
Is it safe to keep the old phone as a spare?
It can be, as long as it still gets security updates, has a strong passcode and stays signed in to Find My or Find Hub. If it’s out of support, wipe it rather than leave an unpatched phone signed in to your accounts.
This guide is general information, not legal or financial advice. Read our editorial policy.