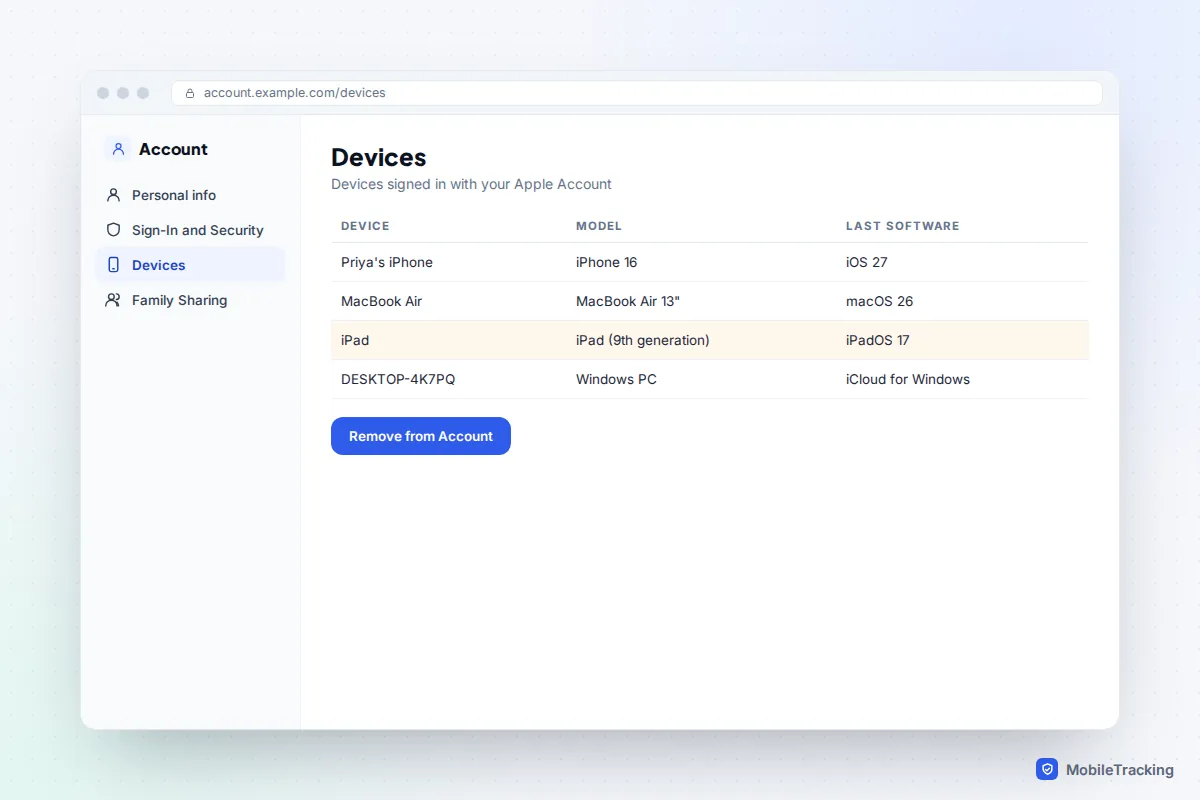
On an iPhone or iPad, open Settings, tap your name at the top, scroll down to the list of devices, tap the one you want gone and choose Remove from Account. On a Mac the same list is in System Settings under your name, and from any browser you can do it at account.apple.com under Devices. It takes under a minute.
There is one catch that trips up almost everyone selling a phone. Removing a device from your account list is not the same as removing it from Find My, and only the Find My route switches off Activation Lock. If the device has left your hands, you probably need both, and this guide shows you which one to use when.
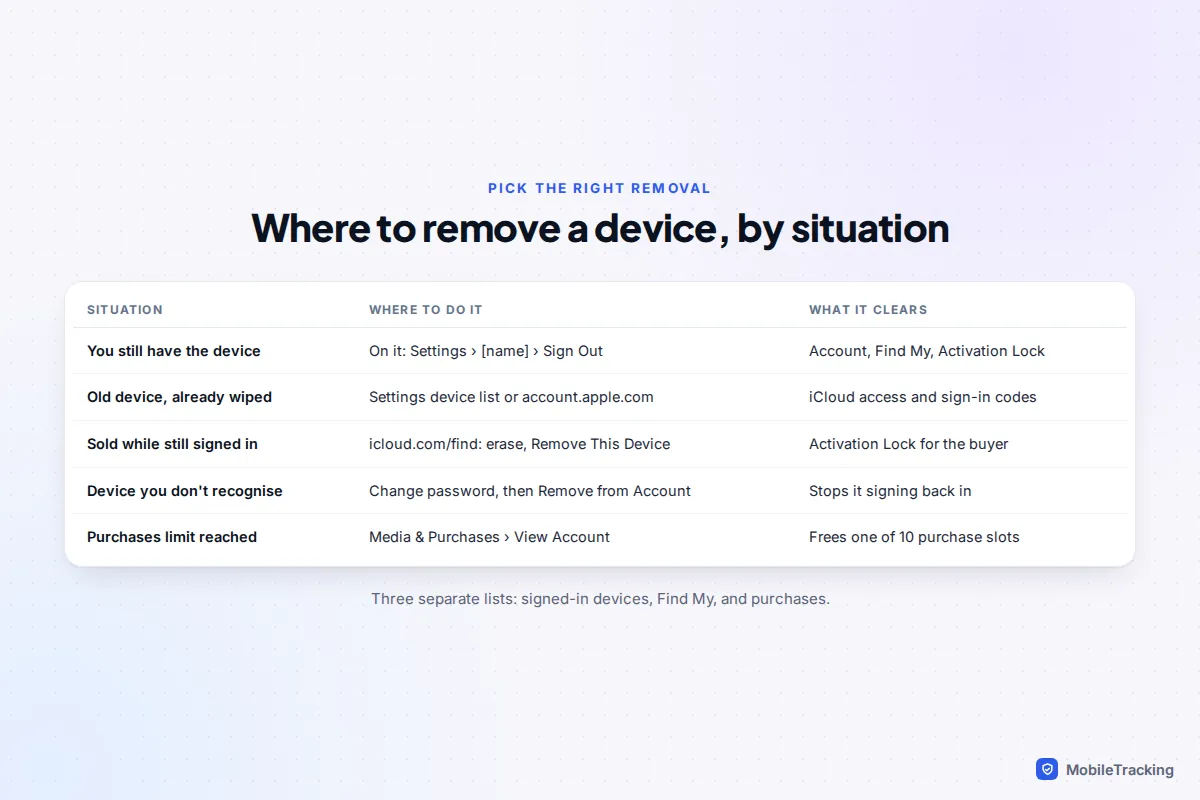
Which kind of “remove” do you need?
Apple keeps three separate lists that people lump together as “my iCloud devices”. The account list controls which devices can use iCloud and receive your two-factor codes. Find My controls tracking and Activation Lock. A third, less-known list controls which devices can download your App Store and Apple TV purchases.
| Your situation | What to do | Why |
|---|---|---|
| You still have the device and want it off your account | Sign out on the device: Settings › [your name] › Sign Out | Removes it from every list at once and turns off Find My |
| Old device you no longer own, already wiped by you | Remove from Account in Settings or at account.apple.com | Tidies the list and stops it receiving codes |
| Sold or gave it away still signed in | icloud.com/find: erase, then Remove This Device | Only this clears Activation Lock for the new owner |
| A device you don’t recognise | Change your password first, then remove it | Otherwise it can simply sign back in |
| Hit the purchases limit | Media & Purchases › View Account › Remove This Device | A separate list, capped at ten devices |
If a device was lost or stolen and you have AppleCare+ with theft and loss cover, leave it on your account until your claim is approved. Apple’s own guidance is to remove it only after the claim has been approved.
How to remove a device on your iPhone, iPad or Mac
This is the quickest method if you have another Apple device to hand. It works the same way on iOS 26 and iOS 27.
- Open Settings and tap your name at the top.
- Scroll to the bottom. You will see every device signed in with your Apple Account, starting with This iPhone.
- Tap the device you want to remove. The details screen shows its model, software version and serial number, which helps when you have two entries with similar names.
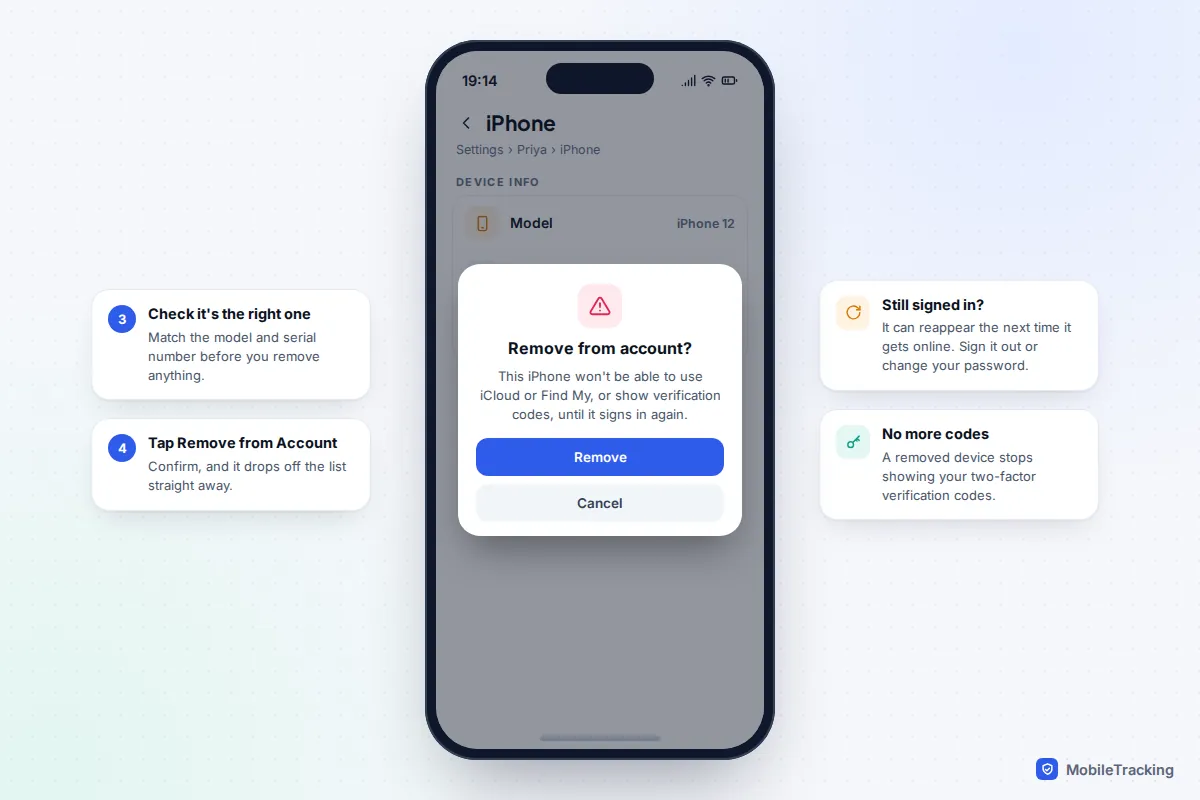
- Tap Remove from Account, then confirm.
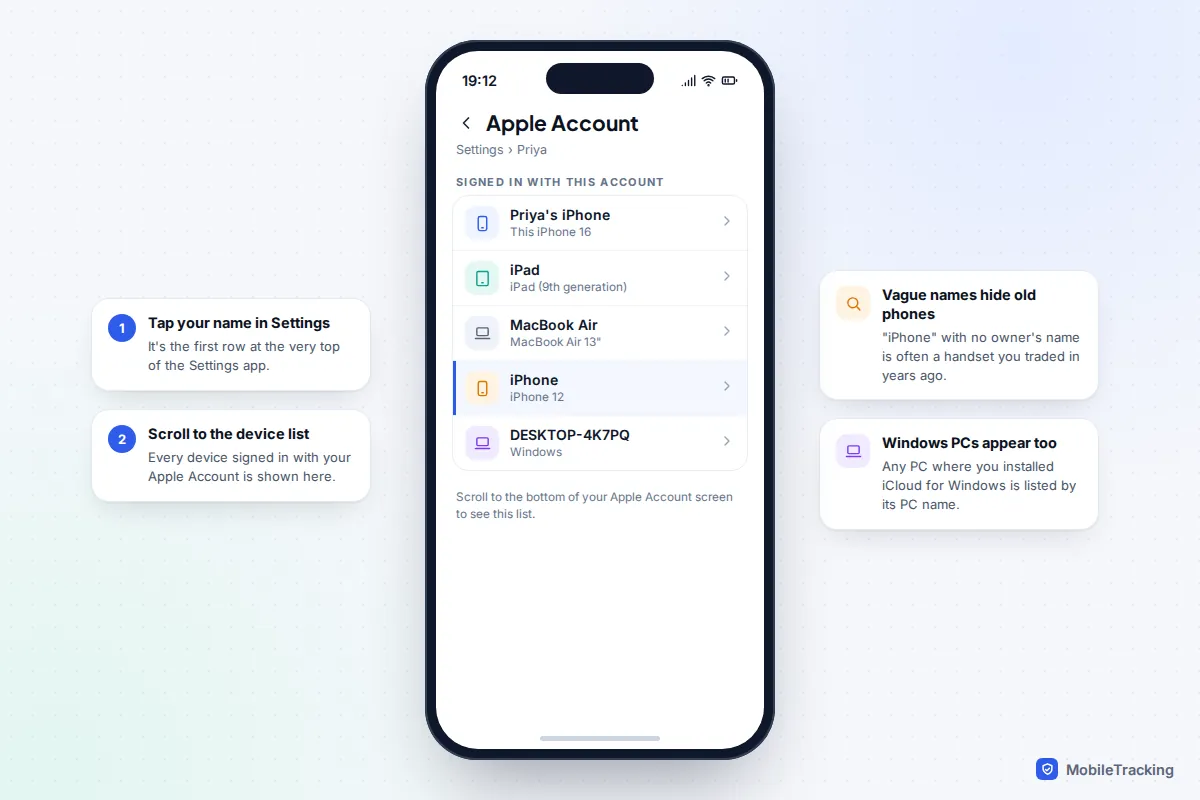
You won’t see Remove from Account for the device you are holding. To take the current device off, you sign out of it instead, which is covered below.
On a Mac, choose the Apple menu, then System Settings, click your name at the top of the sidebar, scroll to the device list, click the device and choose Remove from Account.
What removing actually does
According to Apple’s device list help page, a removed device can no longer use iCloud, Find My or other Apple services, and it stops showing verification codes for two-factor authentication. That last part matters: every device on this list is a trusted device, and any of them can display the six-digit code that lets someone sign in as you.
What it doesn’t do is wipe the device. Photos, messages and files already stored on it stay there. If the device is lost or you can’t trust whoever has it, erase it first, then remove it.
How to remove a device from a web browser
If you don’t have another Apple device, for example you have switched to Android or you are on a Windows laptop, use Apple’s account website. The old appleid.apple.com address now leads to account.apple.com, since Apple renamed Apple ID to Apple Account in 2024.
- Go to account.apple.com and sign in. You will need a verification code sent to a trusted device or phone number.
- Select Devices. You may be asked to sign in again.
- Click the device you want to remove.
- Click Remove from Account and confirm.
If the only trusted device is the one you are trying to remove, the code will go there. In that case, choose Didn’t get a verification code? and send it by text to your trusted phone number instead.
Selling or giving a device away: account list vs Find My
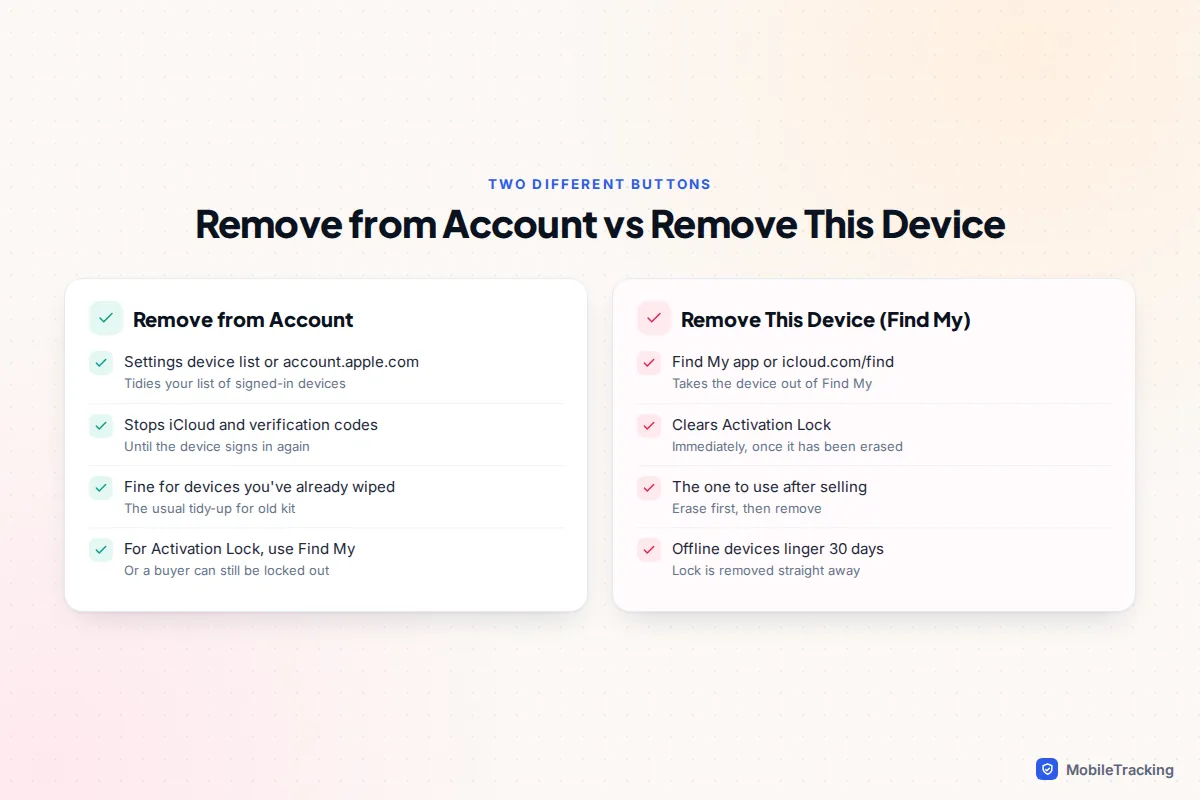
This is where most confusion comes from. Activation Lock switches on automatically when Find My is turned on, and it ties the device to your Apple Account so nobody can set it up without your password. Tapping Remove from Account tidies your list, but it is not the documented way to release Activation Lock. A buyer who turns on a phone still linked in Find My will be stuck at a screen asking for your Apple Account password.
If you still have the device
Do it on the device itself, before you hand it over. Go to Settings › [your name] › Sign Out, enter your Apple Account password when asked (this turns off Find My and Activation Lock), then go to Settings › General › Transfer or Reset iPhone › Erase All Content and Settings. Our guide to wiping a phone before you sell it covers the full checklist, including Apple Pay cards and eSIMs.
If it has already gone
- Go to icloud.com/find and sign in, or open the Find My app on another Apple device and tap Devices.
- Select the device. If the new owner hasn’t erased it yet, choose Erase This Device first.
- Choose Remove This Device and confirm.
Apple’s iCloud.com removal guide says that once an erased device is removed this way, Activation Lock comes off immediately and the device disappears from Find My. If the device is offline, Activation Lock is removed straight away, but the entry stays in Find My for 30 days. If a device that is still online and signed in won’t let you remove it, erase it first.
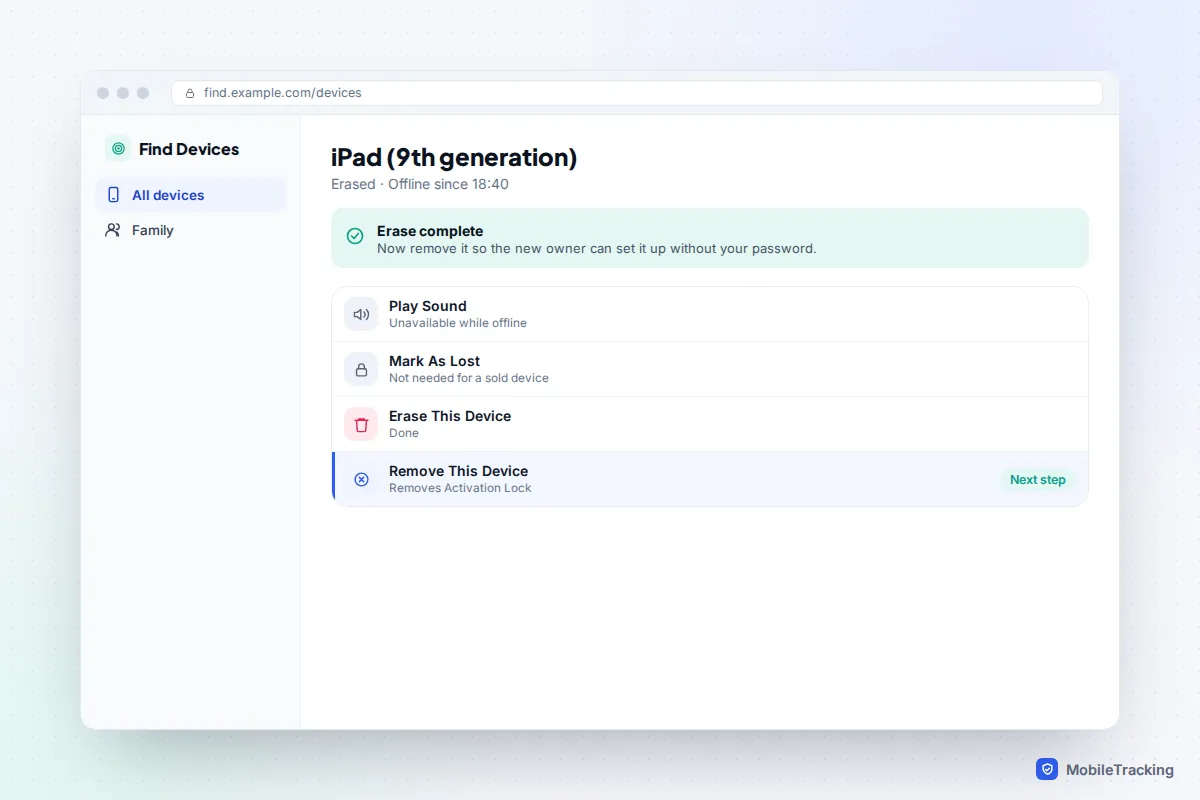
Here is how that plays out. Priya sells her old iPad on a marketplace and forgets to sign out. The buyer messages that evening with a photo of the “iPad Locked to Owner” screen. Priya opens Find My on her iPhone, taps the iPad, chooses Erase This Device, then Remove This Device. Ten minutes later the buyer restarts it and it sets up normally, no password needed.
A device you don’t recognise
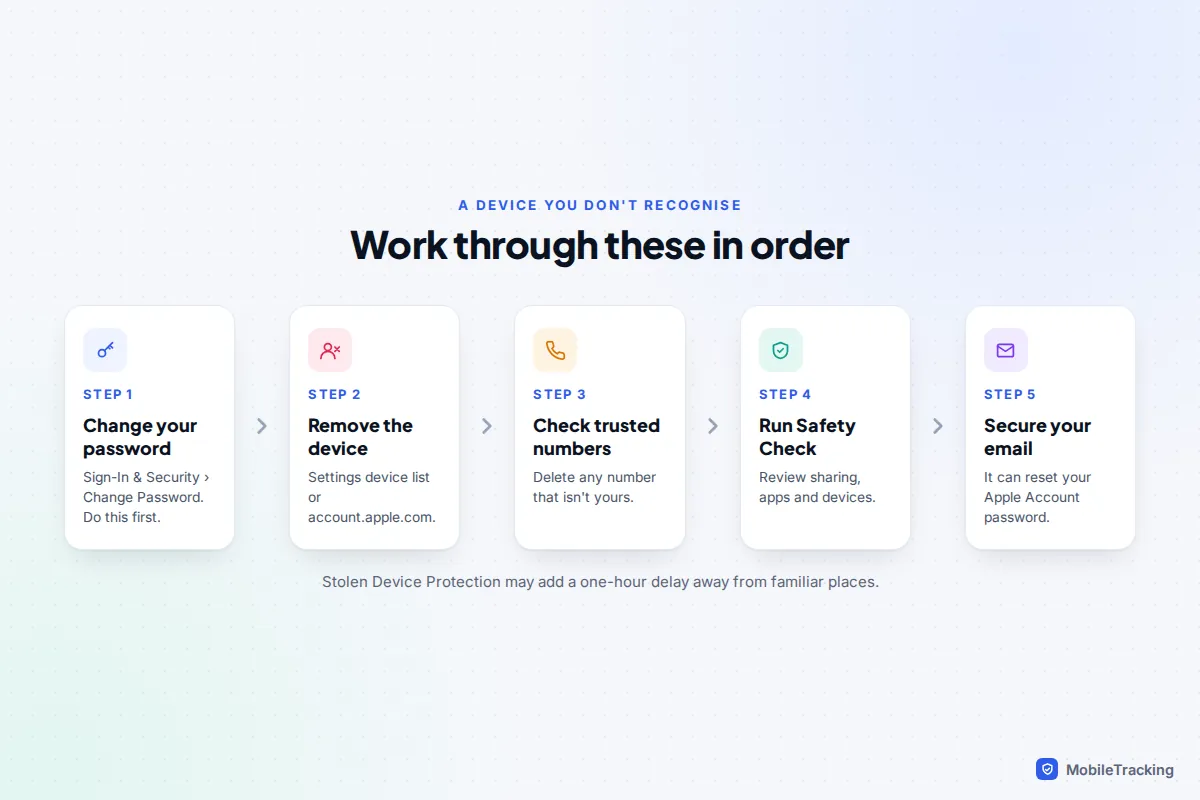
An unfamiliar entry is usually innocent: an old phone you traded in years ago, a Mac with a factory name like “MacBook Air”, or a Windows PC where you once installed iCloud. Tap it and check the model, software version and serial number against what you own. If it still doesn’t fit, treat it as someone else signed in with your account and work through these steps in order.
- Change your Apple Account password first. Go to Settings › [your name] › Sign-In & Security › Change Password. If you remove the device before changing the password, whoever has it can just sign back in.
- Remove the device from the list, as above.
- Check your trusted phone numbers in Sign-In & Security and remove any you don’t own. A stranger’s number here can receive your sign-in codes.
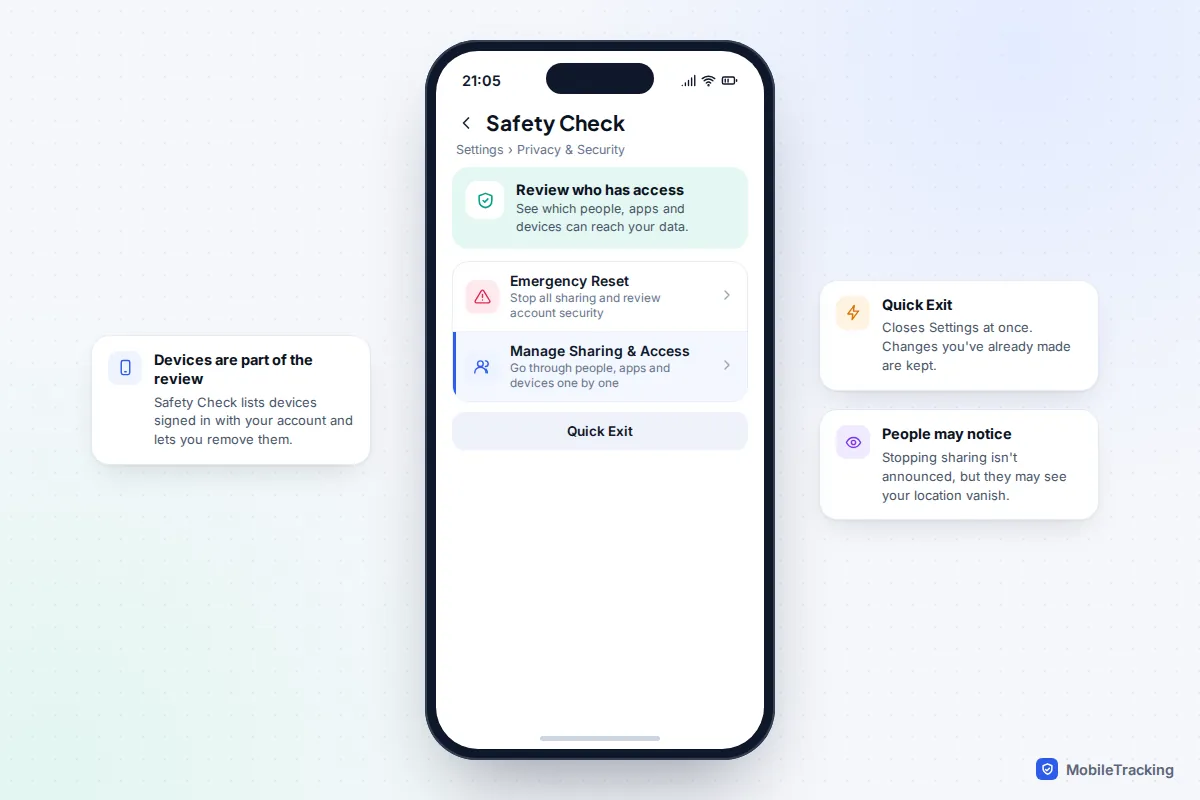
- Run Safety Check at Settings › Privacy & Security › Safety Check. Choose Manage Sharing & Access to review, one at a time, who can see your location, photos and other data and which devices are signed in, or Emergency Reset to stop all sharing at once.
- Check your email account too, because anyone who controls your email can often reset your Apple Account password.
If Stolen Device Protection is on and you are away from a familiar place such as home or work, changing your password and removing a trusted device can come with a one-hour Security Delay. That is the feature working as designed. Wait it out, or do it at home.
For a wider check of what someone might be able to see, such as shared photo albums, notes and location, work through our guide on telling whether someone has access to your iCloud.
Family Sharing devices and the purchases list
Your family’s devices are signed in with their own Apple Accounts, so they never appear in your Settings device list and you can’t remove them from there. They may appear in your Find My app if the family member shares their location with you, but that is a view of their account, not yours. To take a child’s old iPad off their account, sign in on it as the child, or use account.apple.com with the child’s details, and remove it the same way.
Purchases work differently again. Apple lets you have ten devices, no more than five of them computers, associated with your account for downloading purchases. That list is separate from the devices you are signed in to. If you hit the limit, go to Settings › [your name] › Media & Purchases › View Account and tap Remove This Device, or use Manage Devices in the Apple Music or Apple TV app on a Mac or PC. Once a device is associated with one account, you may have to wait up to 90 days to associate it with a different one.
What happens to backups, photos and messages
Removing a device from your account does not delete its iCloud backup. The backup stays in your storage, still counting towards your plan, and you can restore it to a new device later. Apple says iCloud backups remain available for 180 days after you turn off or stop using iCloud Backup, after which they can be deleted.
To delete an old device’s backup yourself and free the space, go to Settings › [your name] › iCloud, tap Storage or Manage Account Storage (the label depends on your version), then Backups, tap the old device and choose Turn Off and Delete from iCloud. Only do this once you are sure your current phone has its own recent backup; our guide to backing up your iPhone shows how to check.
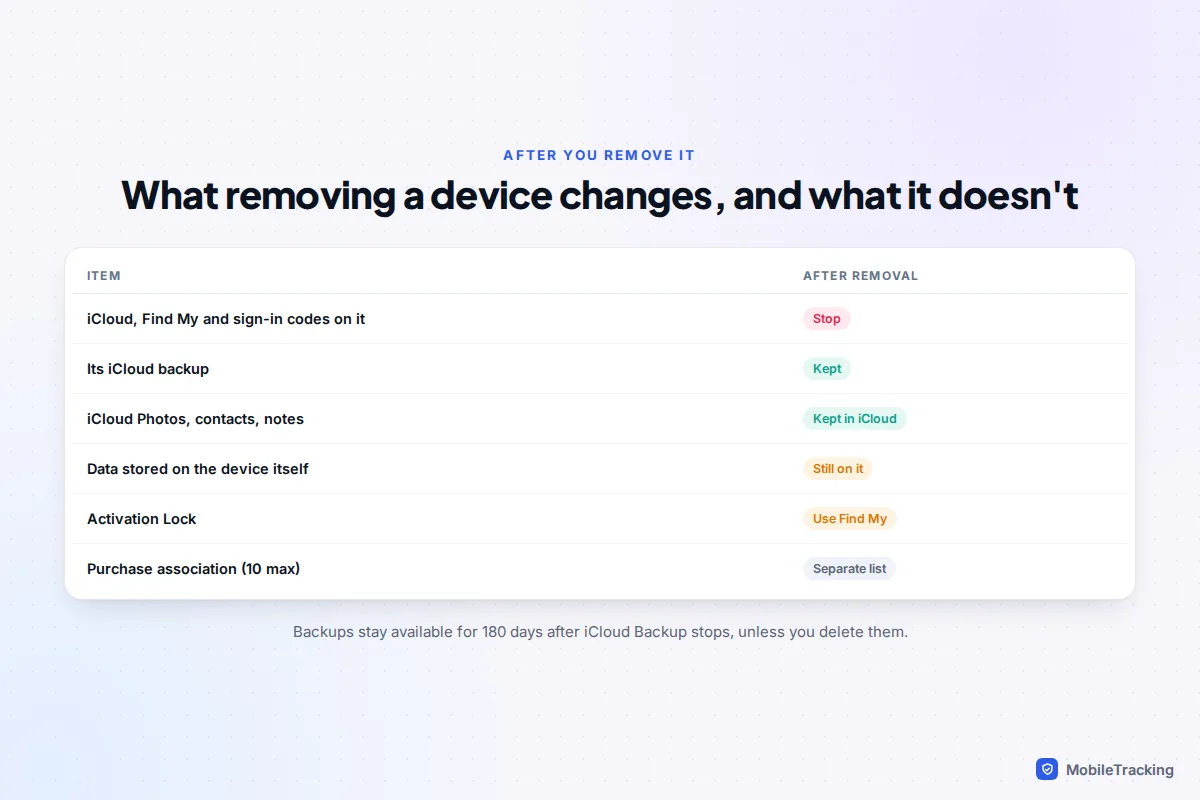
Your iCloud Photos, contacts, calendars and notes aren’t affected, because they are stored in iCloud and sync to your remaining devices. Messages in iCloud work the same way. The only data at risk is what sits on the removed device itself, which is why a lost or sold device should be erased.
When a removed device keeps coming back
A device that reappears is almost always still signed in somewhere.
It reappears within minutes or hours. The device is still signed in and reconnected to the internet. Sign out on the device itself. If you can’t reach it, change your password and then remove it again.
It came back about a month later. You removed an offline device from Find My, and it came online after the 30-day window. Apple says Activation Lock turns back on if the device is still signed in to your account. Erase it from Find My, then remove it again.
There is no Remove from Account button. You are looking at the device you are using. Sign out of it instead, or remove it from another device or the website.
You see two entries for the same phone. This often happens after an erase and restore. Compare the serial numbers and software versions; the stale entry usually shows an older iOS version. Remove that one.
AirPods or Beats keep returning. These are listed in Find My because they are paired with your iPhone. Unpair them in Settings › Bluetooth, then remove them in Find My while they are out of range.
The removal asks you to wait an hour. That is Stolen Device Protection’s Security Delay. Wait, or make the change at a familiar location.
Frequently asked questions
Does removing a device from my Apple Account turn off Activation Lock?
Not reliably. Activation Lock is tied to Find My. To clear it for someone else, sign out on the device, or use Remove This Device in Find My after erasing it. Removing from the account list alone can leave the new owner stuck.
Will the other device be told it has been removed?
Assume they will notice. Whoever uses it will find iCloud features stop working and may be asked to sign in again. Plan for that if the person could react badly.
Can I remove a device I no longer have?
Yes. Use Settings on another Apple device or account.apple.com for the account list, and icloud.com/find for Find My. Erase it first if there is any chance someone else is using it.
Does removing a device delete my photos or backups?
No. Photos and other iCloud data stay in iCloud, and the device’s backup stays in your storage until you delete it or Apple removes it 180 days after backups stop.
Why does a device I sold years ago still show up?
It was probably never signed out before it left your hands, so its entry stayed on your account. Remove it from the list, remove it from Find My if it appears there, and change your password if you are unsure what happened to it.
This guide is general information, not legal or financial advice. Read our editorial policy.