
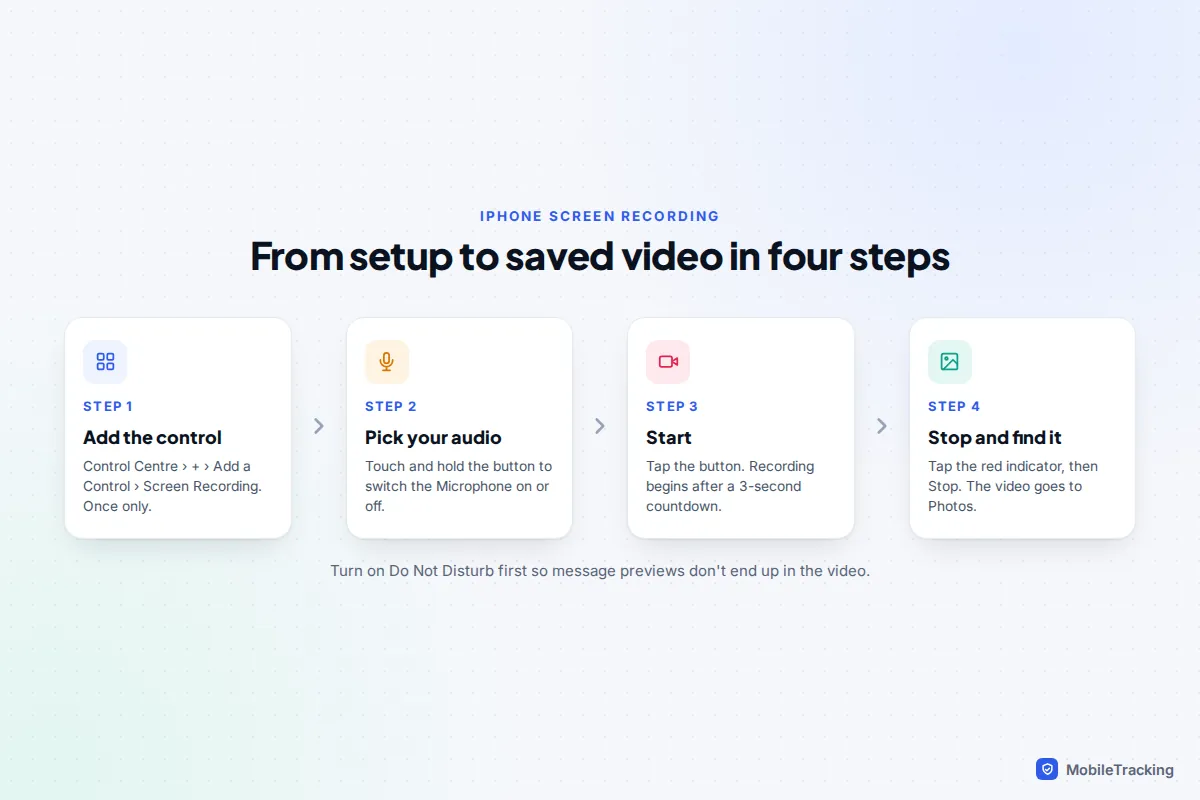
To screen record on an iPhone, swipe down from the top-right corner to open Control Centre, tap the Screen Recording button (a solid circle inside a ring) and wait for the three-second countdown. Everything on screen is now being captured. To stop, tap the red indicator at the top of the screen and choose Stop. The video is saved to the Photos app.
If the button isn’t in Control Centre, you need to add it once, which takes about 20 seconds on iOS 18 and later. And if you want your own voice in the recording, touch and hold the button first and turn the Microphone on. This guide covers both, plus trimming, file sizes, the apps that deliberately record black, recording calls with consent, and how to turn the feature off on a child’s iPhone.
Add Screen Recording to Control Centre
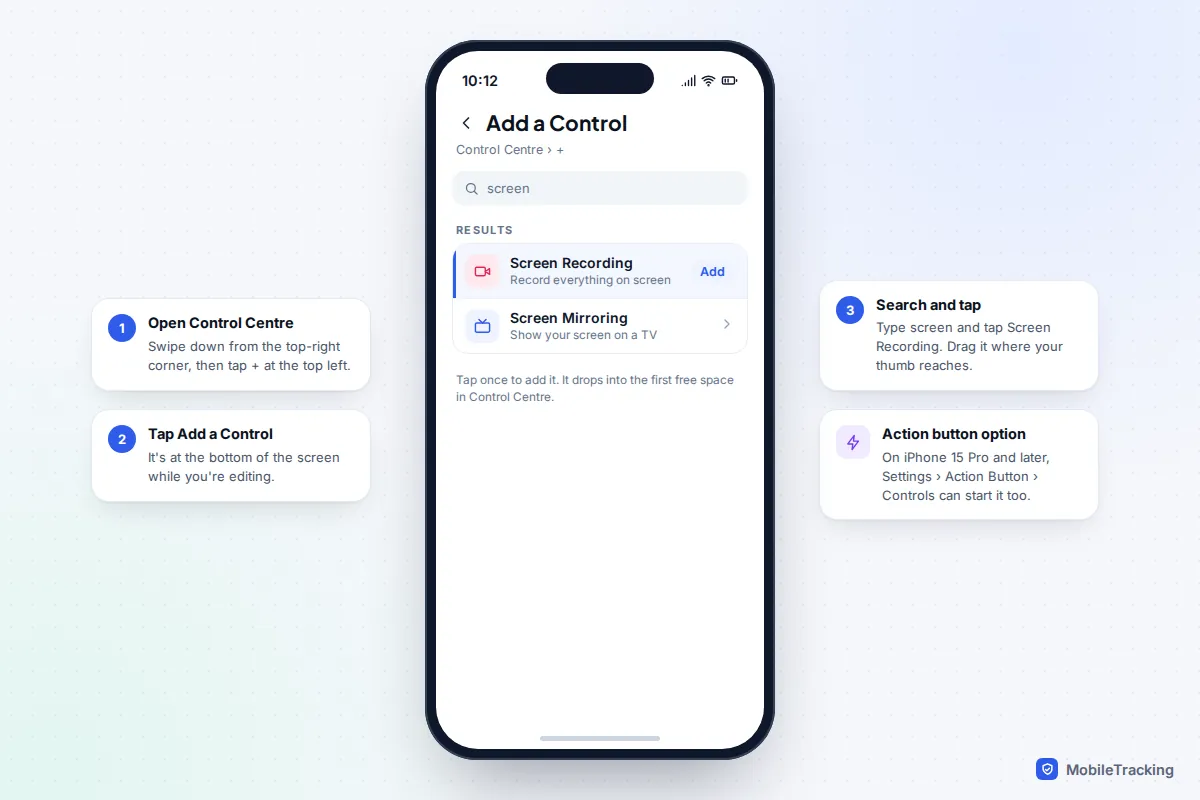
Since iOS 18, Control Centre is fully customisable, and Screen Recording is no longer added from the Settings app. You add it straight from Control Centre itself. The steps are the same on iOS 26 and iOS 27, and Apple’s own guide to taking a screen recording on iPhone follows the same route.
- Swipe down from the top-right corner of the screen. On an iPhone with a Home button, such as an iPhone SE, swipe up from the bottom edge instead.
- Tap the + in the top-left corner, or touch and hold any empty space in Control Centre.
- Tap Add a Control at the bottom of the screen.
- Type “screen” in the search box and tap Screen Recording. It drops into the first free space.
- Drag it somewhere easy to reach, then tap an empty area to finish editing.
If you have an iPhone with an Action button (iPhone 15 Pro and later models), you can also put screen recording on that button. Go to Settings › Action Button, swipe across to Controls and pick Screen Recording from the list of controls. A press then starts or stops a recording without opening Control Centre, which is handy when you are demonstrating something step by step.
Start, stop and choose whether to record your voice
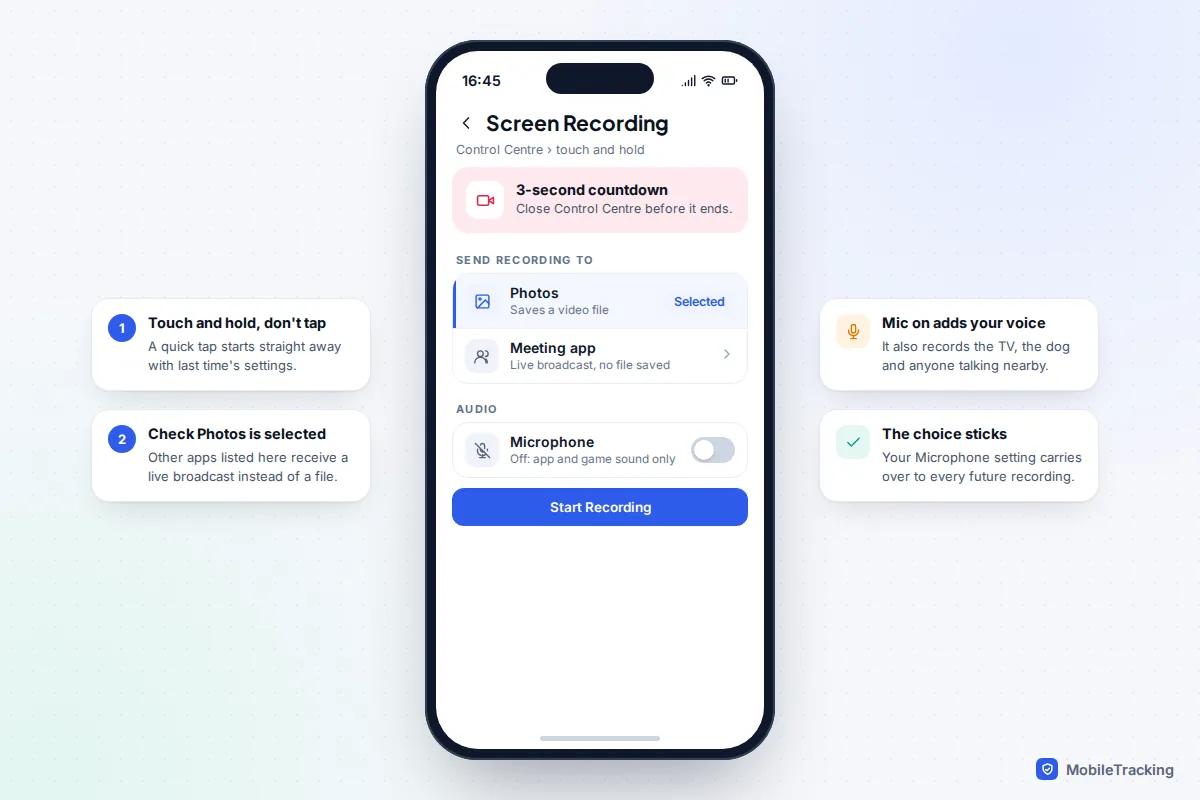
A quick tap on the Screen Recording button starts a recording with whatever audio setting you used last time. The button counts down from three, which gives you time to close Control Centre so it doesn’t appear in the video.
While recording, a red indicator shows at the top of the screen: a red pill in the Dynamic Island on newer iPhones, or a red background behind the clock on older ones. To stop, use any of these:
- Tap the red indicator, then tap Stop.
- Open Control Centre and tap the red Screen Recording button.
- Press the Action button again, if you set it up that way.
A banner then confirms the video was saved to Photos. Use one of these three methods rather than pressing the side button: locking the phone mid-recording doesn’t behave the same way on every iOS version.
Microphone on or off
Touch and hold the Screen Recording button, rather than tapping it, to see its options. Tap Microphone to switch it on (the icon turns red) or off, then tap Start Recording.
- Microphone off records the sound your iPhone plays: game music, a video’s soundtrack, app sounds. It does not record you or the room. This is the right choice for a clean tutorial or a game clip.
- Microphone on adds whatever the iPhone’s microphone hears, so you can talk someone through what you are doing. It also picks up the television, the dog and anyone chatting nearby.
The setting sticks between recordings, so check it before anything important. The same panel lists apps that can receive a live broadcast of your screen, such as some meeting apps. Make sure Photos is selected if you just want a video file.
Before a longer recording, turn on Do Not Disturb from Control Centre. Otherwise any notification that arrives, including the first line of a private message, is recorded along with everything else.
Where recordings are saved, and how to trim them
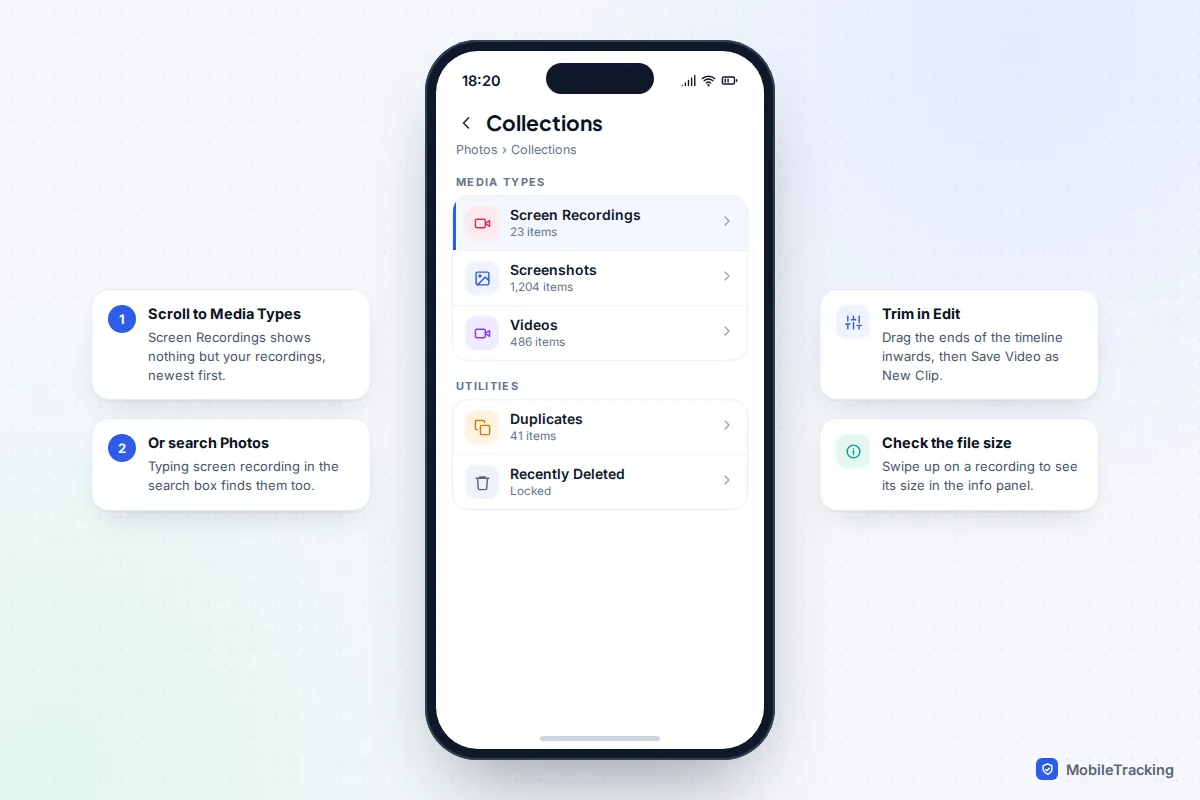
Every screen recording goes into your Photos library alongside your other videos. The quickest way to find one is to open Photos, scroll down to Media Types and tap Screen Recordings, which shows nothing else. Typing “screen recording” into the Photos search box works too. If you use iCloud Photos, the recording uploads and appears on your other Apple devices a few minutes later.
Trim the start and end
Almost every recording begins with a second or two of Control Centre and ends with you reaching for the stop button. To cut those off:
- Open the recording in Photos and tap Edit.
- Drag the handles at either end of the timeline strip at the bottom inwards. The strip turns yellow to show the section you are keeping.
- Press play to check, then tap Done.
- Choose Save Video to replace the original, or Save Video as New Clip to keep both.
Trimming with Save Video can be undone later: open the video, tap Edit, then Revert. In the same editor, the crop tool lets you cut the status bar off the top of the frame, which hides the time, your battery level and your mobile network name.
Resolution, length and storage
There is no quality setting for screen recording on iPhone. The camera’s video settings in Settings › Camera › Record Video have no effect on it. The recording is made close to your screen’s own resolution, so it looks sharp but produces a tall, portrait-shaped video.
There is also no fixed time limit. What stops a long recording is usually running low on storage or battery. The file size depends mostly on how much moves on the screen: scrolling slowly through a settings menu compresses well, while a fast game or a playing video makes a much bigger file for the same length. To see exactly how much space a recording uses, open it in Photos, swipe up or tap the i button, and read the size in the information panel.
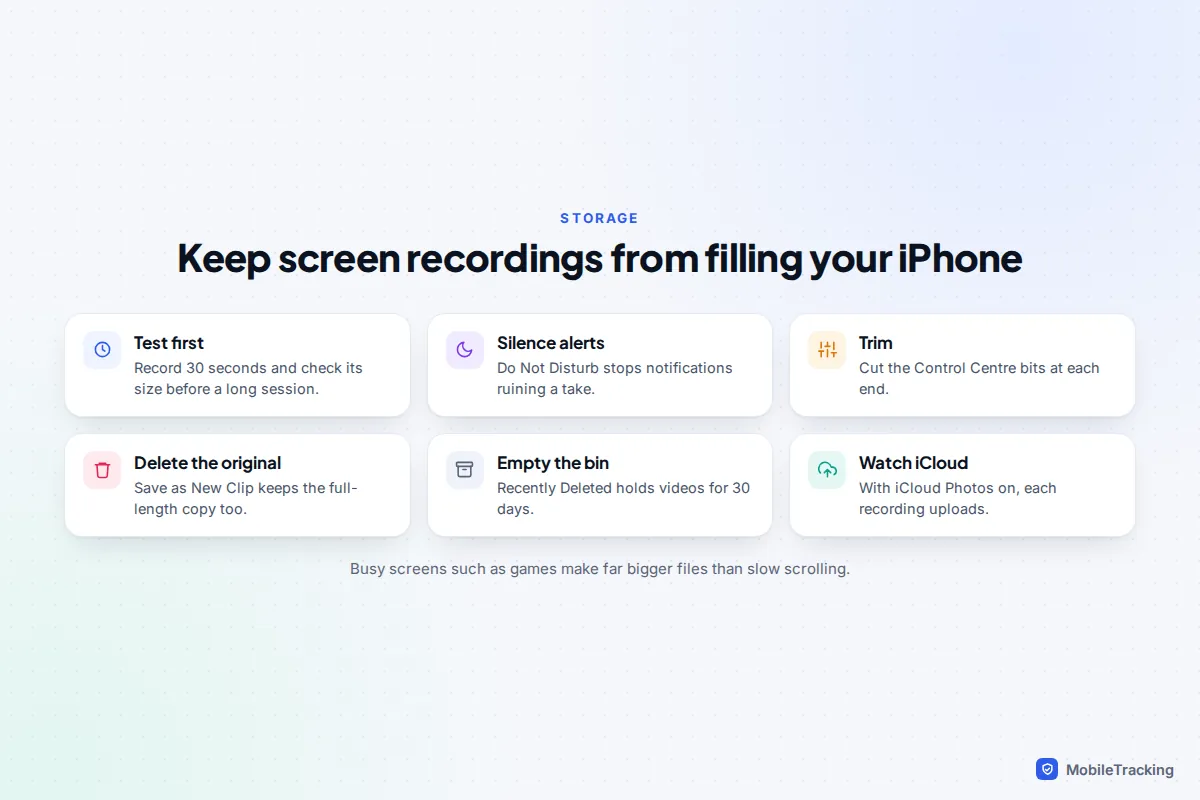
Three habits keep recordings from quietly filling your iPhone:
- Record a short test first before anything long, and check its size in the information panel.
- Delete the original after trimming. If you chose Save Video as New Clip, the full-length version is still there.
- Empty Recently Deleted. Deleted videos stay in Utilities › Recently Deleted for 30 days and still use space until then. Our guide on freeing up storage on your phone has a wider clear-out plan.
Apps that block screen recording
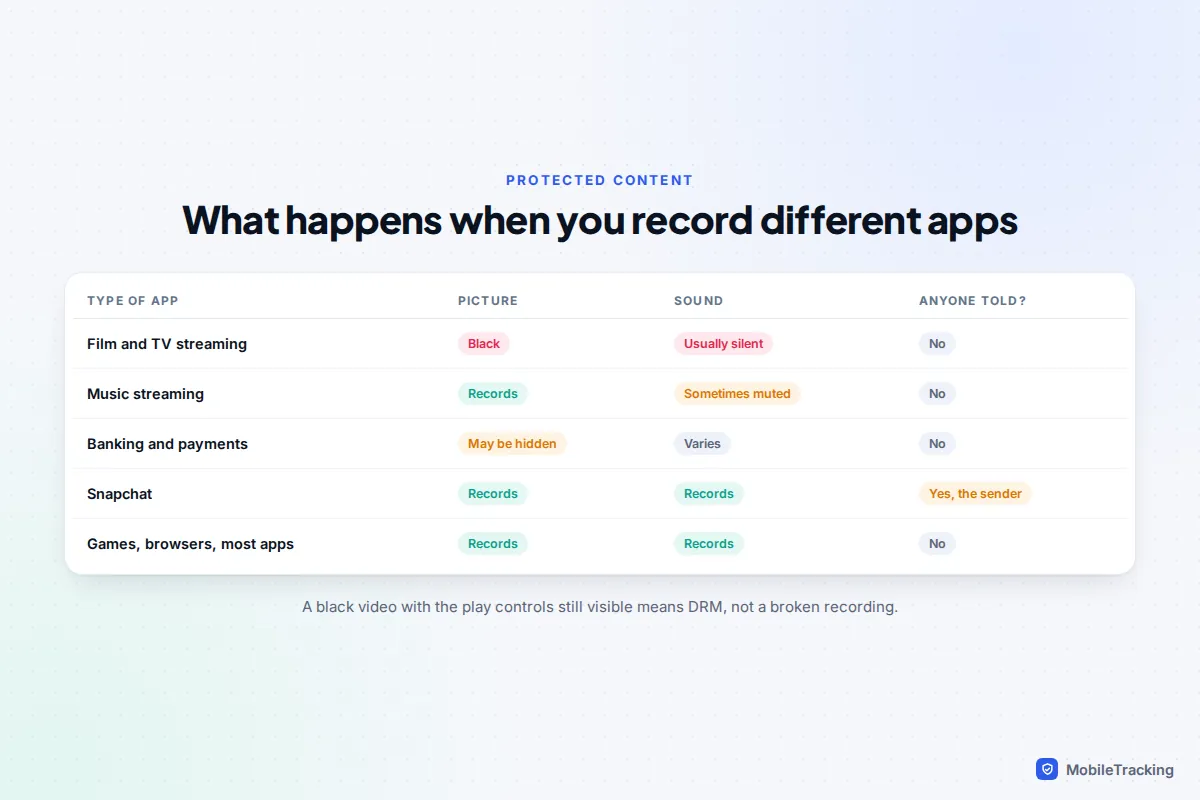
Some apps can’t be screen recorded, by design. Film and TV streaming apps protect their content with DRM (digital rights management), a copy-protection system that the iPhone enforces. Record Netflix, Disney+ or the Apple TV app and you typically get a black rectangle where the video should be, often with no sound either. The menus and buttons around it may still show. This isn’t a fault, and there is no setting to change it.
Other apps respond in different ways:
| Type of app | What usually happens |
|---|---|
| Film and TV streaming | Black video, usually silent |
| Music streaming | Picture records; some services mute the music |
| Banking and payment apps | Some hide account details or show a blank screen while recording |
| Snapchat | Records, but tells the other person you recorded their Snap or chat |
| Games, browsers, most apps | Record normally, with sound |
Behaviour varies from app to app and changes with updates, so test before relying on it. If an app refuses to record, respect that: the content owner has chosen not to allow copies, and tools that claim to get round DRM are usually breaking the app’s terms and sometimes the law.
Recording FaceTime and phone calls
You can start a screen recording during a FaceTime video call and the picture will record. The sound is another matter. User reports consistently show the other person’s voice is missing, and often yours too, because iOS protects live call audio from the screen recorder. Apple doesn’t document the exact behaviour, so play back a short test before counting on it.
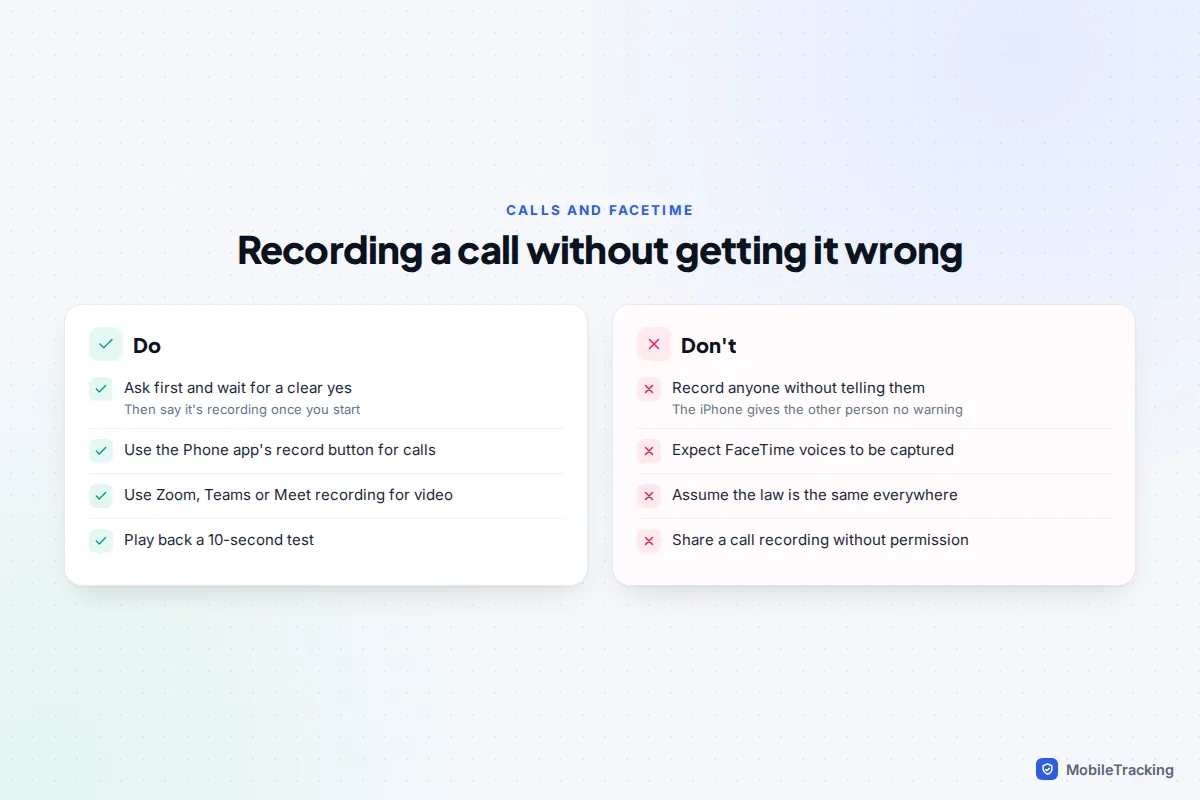
The bigger issue is consent. Screen recording gives the other person no warning at all. Recording laws differ between countries and, in the US, between states: some allow recording when one person on the call agrees, others need everyone’s agreement, and calls can cross those borders. Our guide on call-recording laws where you live explains the rules. The safe habit is to ask, get a clear yes, and say “it’s recording now” once you start.
For a proper recording with everyone’s voice:
- Phone calls and FaceTime audio calls: on supported iPhones and regions, the Phone app has a built-in record button that announces the recording to everyone and saves audio and a transcript to Notes. See how to record a phone call on iPhone legally.
- Video calls: Zoom, Teams and Google Meet have their own record buttons that notify every participant. Our guide to screen recording a video call compares them.
Turn off screen recording on a child’s iPhone
Parents switch screen recording off for a few good reasons: it can capture someone typing a passcode, including the Screen Time passcode, and it can be used to keep copies of friends’ disappearing messages or photos without their knowledge. Apple describes the restriction simply as preventing “the ability to capture the screen and sound”.
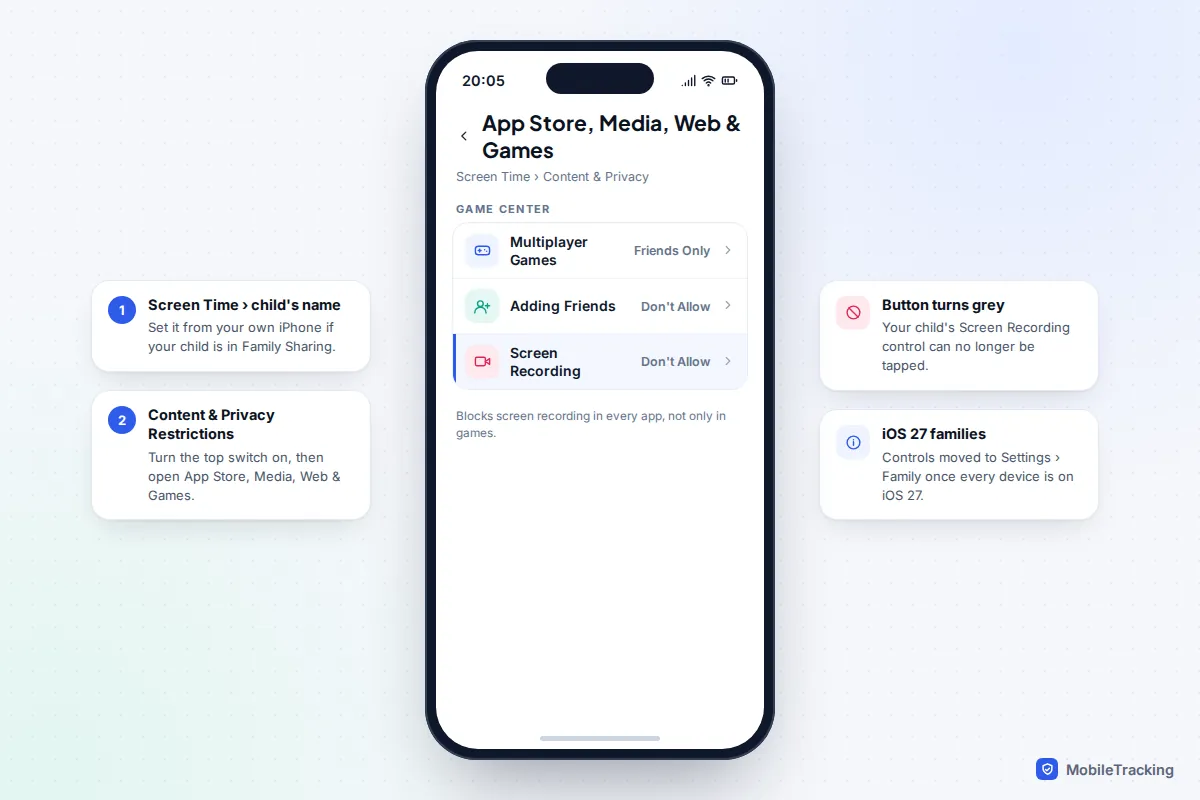
With the previous version of Screen Time (iOS 26 and earlier), set it from your own iPhone if your child is in your Family Sharing group:
- Go to Settings › Screen Time and tap your child’s name.
- Tap Content & Privacy Restrictions and make sure the switch at the top is on.
- Tap App Store, Media, Web & Games (called Content Restrictions on older versions).
- Scroll to the Game Center section at the bottom, tap Screen Recording and choose Don’t Allow.
Despite sitting under Game Center, the setting blocks screen recording everywhere, not just in games. The button then appears greyed out in your child’s Control Centre. iOS 27 rebuilt Screen Time for children, and once every device in your Family Sharing group is on iOS 27, the controls live in Settings › Family under your child’s name, in the restrictions for apps and websites. Apple hasn’t said much about where each individual switch landed, so if you can’t spot Screen Recording, check it the practical way: open Control Centre on your child’s phone and see whether the button is greyed out. Our iPhone parental controls setup guide walks through the rest.
Tell your child you’ve done it and why. A switched-off feature they discover by surprise feels like a punishment; one you’ve explained is just a house rule.
Troubleshooting by symptom
| What happens | Likely cause | What to try |
|---|---|---|
| Button is greyed out | A Screen Time restriction, or a school or work profile that manages the phone | Check the Game Center section of Screen Time; ask whoever manages the device |
| No button at all | It has never been added, or was removed | Add it through + › Add a Control |
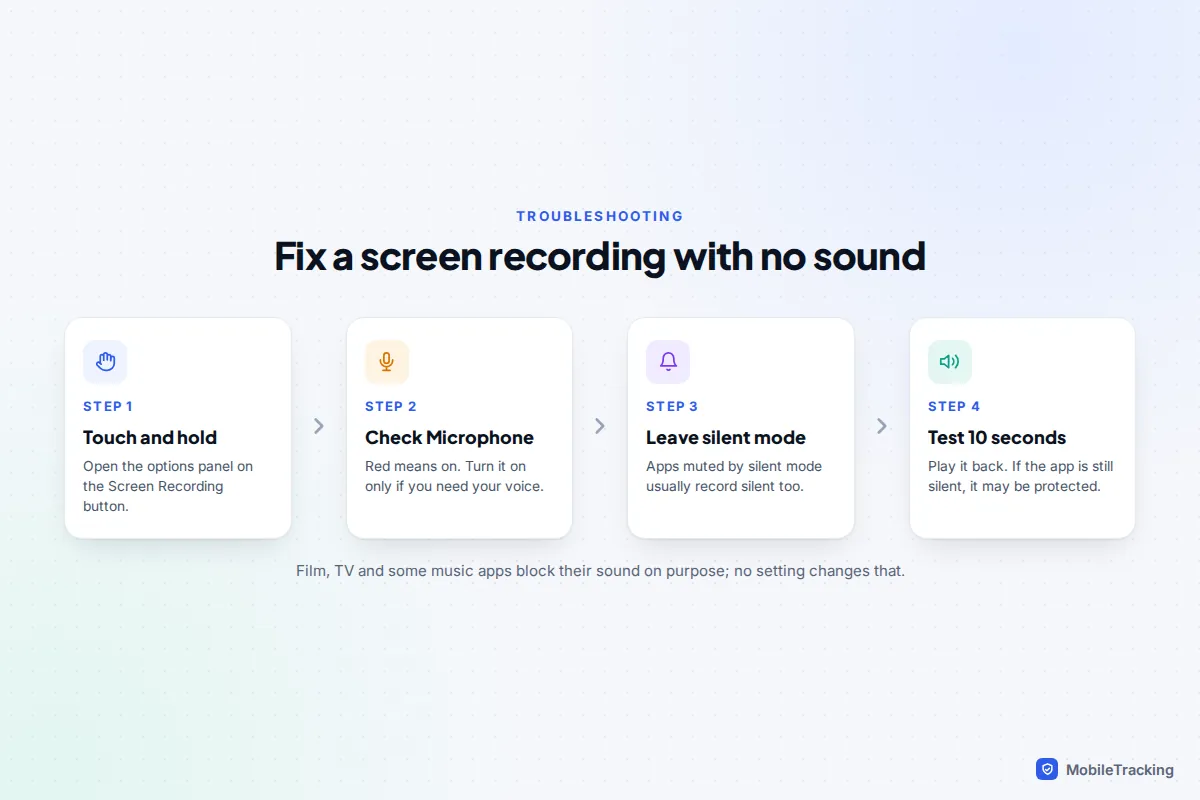
| No sound | Microphone off, silent mode, or protected audio | Touch and hold to check Microphone; turn silent mode off; test another app |
| Black video | DRM-protected content | Nothing to fix; the app doesn’t allow copies |
| “Failed to save” message | Storage full, protected content, or a software glitch | Free space, restart, update iOS; some users find turning off Low Power Mode helps |
| Recording stopped early | Storage ran out, the battery died, or an interruption such as an incoming call | Free space, plug in, record in shorter parts |
On “no sound”: if an app’s sounds are muted because the Ring/Silent switch or Action button has put the iPhone in silent mode, and you can’t hear them, the recording usually won’t have them either. Turn silent mode off and the volume up, then try again. A recording that fails to save generally can’t be recovered, so for anything you can’t repeat, such as a live stream, free a few gigabytes before you start.
Frequently asked questions
Does screen recording notify the other person?
The iPhone itself never tells anyone. Some apps do: Snapchat, for example, notifies people when you record their Snaps or chats. FaceTime and most messaging apps give no warning, which is why you should ask before recording anything that involves someone else.
How long can an iPhone screen recording be?
There is no set limit. A recording runs until you stop it or the phone runs short of storage or battery. Long recordings of busy screens make very large files, so record in shorter parts where you can.
Why can’t I hear my voice in the recording?
The Microphone is off. Touch and hold the Screen Recording button in Control Centre, tap Microphone so the icon turns red, then start recording. The setting stays on for future recordings until you switch it off.
Can I screen record Netflix or other streaming apps?
No. Streaming services protect their videos with DRM, so the recording shows a black screen and usually has no sound. This is deliberate and can’t be changed in Settings.
Where did my screen recording go?
Check Photos › Media Types › Screen Recordings. If it isn’t there, the recording may have failed to save, usually because storage was full or the content was protected. You’ll normally see a “failed to save” message when that happens.
This guide is general information, not legal or financial advice. Read our editorial policy.