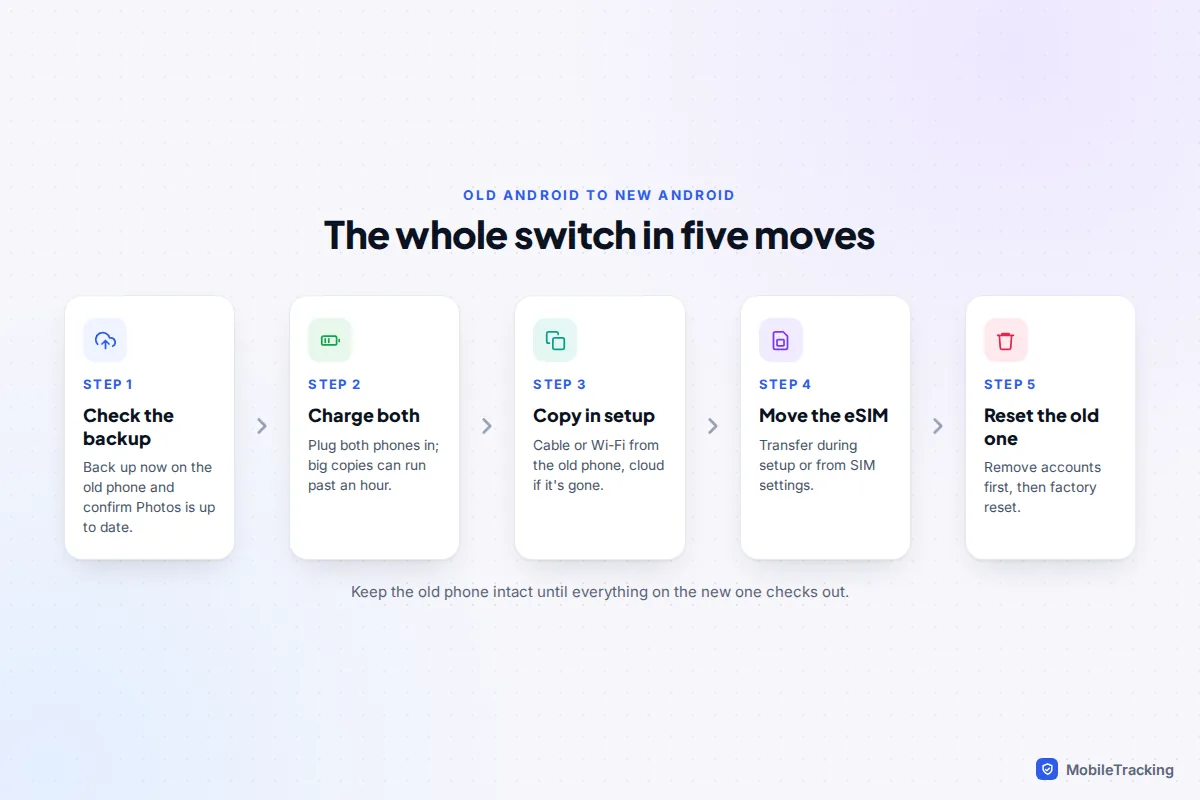
The quickest way to set up a new Android phone from your old one is to copy directly during setup: when the new phone asks whether to copy apps and data, connect the old phone with a USB-C cable (or copy over Wi-Fi) and let it transfer. Only if the old phone is lost, broken or already wiped do you need the cloud route, where you sign in to your Google account during setup and pick your latest Google backup. Either way, this has to happen during setup, because Google’s backup can’t bring back app data, settings or messages once setup is finished.
Before you start, spend five minutes on the old phone. A backup that stopped running in March, a WhatsApp backup that was never switched on or an authenticator app that doesn’t sync are the things that turn a smooth switch into a lost weekend.
First, check the backup on your old phone
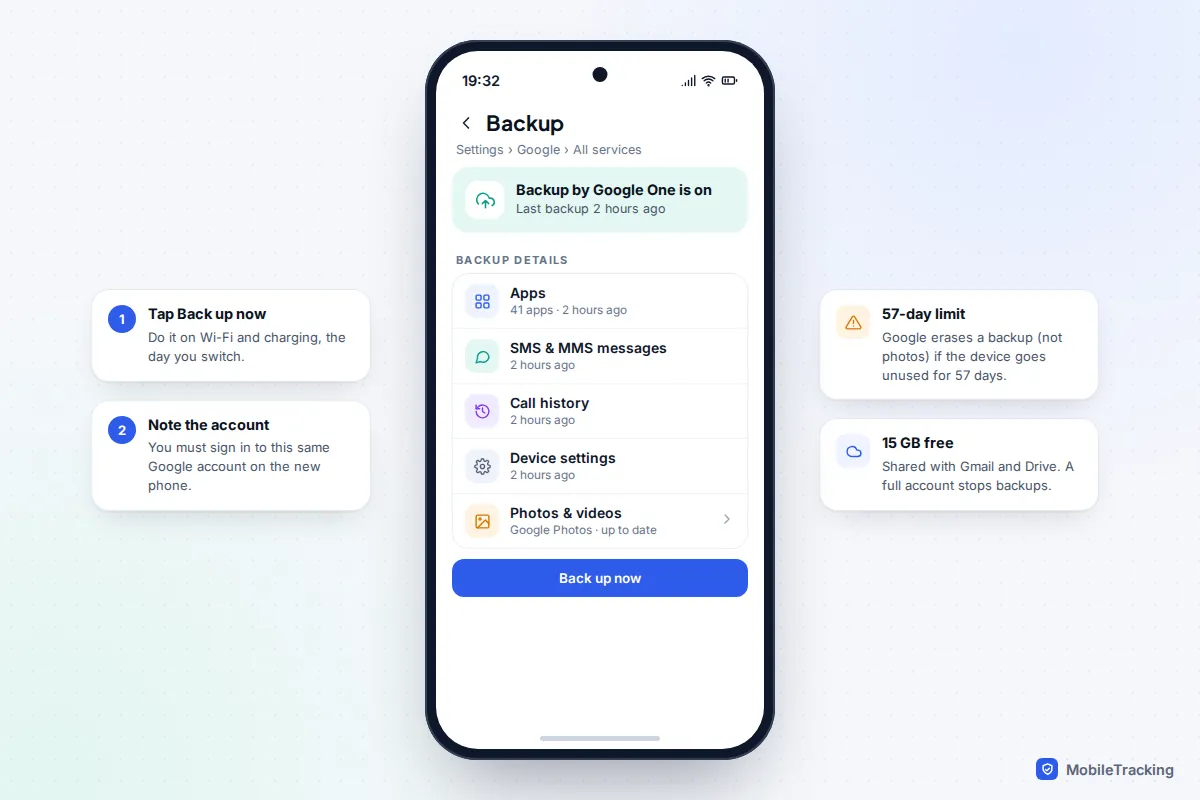
Even if you plan to copy by cable, a fresh Google backup is your insurance if the cable transfer fails halfway. On the old phone:
- Open Settings › Google › All services › Backup. On a Pixel you can also use Settings › System › Backup; on a Samsung look under Settings › Accounts and backup. If you can’t find it, search Settings for “backup”.
- Make sure backup is switched on (usually labelled Backup by Google One) and note which Google account it uses.
- Tap Back up now while on Wi-Fi and charging, then check the backup details: apps, SMS and MMS, call history and device settings should all show a recent time.
- Open Google Photos and check the top of the screen says your photos are backed up, not “waiting” or “paused”.
Two limits are worth knowing. The backup uses your Google storage, which is 15 GB free and shared with Gmail and Drive, so a full account quietly stops backups. And Google’s backup help says that if a device isn’t used for 57 days, its backup (apart from photos and videos) is erased, so don’t leave the old phone in a drawer for two months and expect to restore from it. Our guide to backing up your Android phone covers the settings in more detail.
Cable, Wi-Fi or cloud: which way to copy
New Android phones offer the same basic choice during setup, though the words differ between a Pixel, a Samsung Galaxy and other brands.
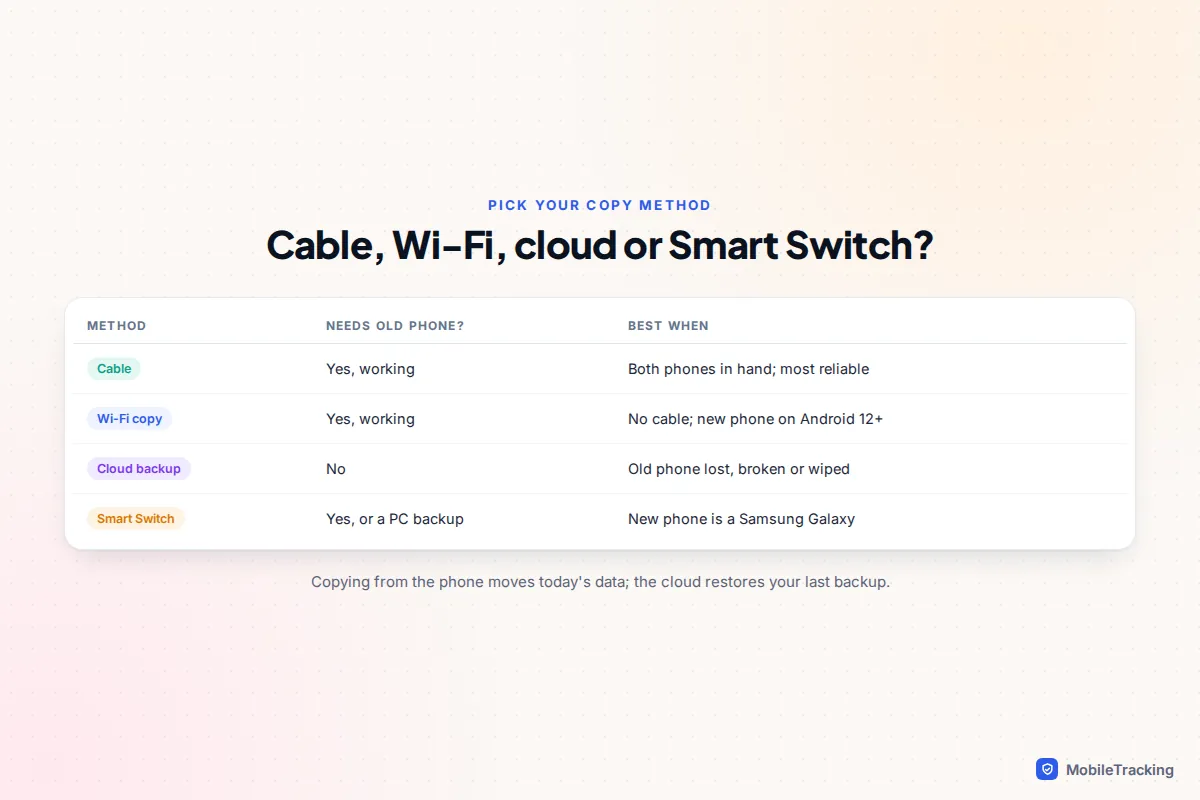
Cable is the most reliable option when both phones are in your hands: it doesn’t depend on Wi-Fi and copies directly from the old phone. Wireless copying does the same over Wi-Fi; Google says it needs Android 5 or later on the old phone and Android 12 or later on the new one. Cloud restores your last Google backup and is the only choice if the old phone is gone. For iPhone users switching over, the same setup screen offers to copy from an iPhone instead.
Whichever you choose, plug both phones in. A copy with a lot of photos and videos can easily run past an hour, and a phone that dies halfway through means starting again.
Set up a Pixel or most Android phones, step by step
This is the Pixel flow, which most other Android brands follow closely. Labels vary slightly by manufacturer and Android version.
- Turn on the new phone, choose your language and connect to Wi-Fi. Insert your physical SIM now if you have one.
- When you see Copy apps & data, tap Next.
- Unlock your old phone. To use a cable, connect the two with a USB-C cable and follow the prompts on both screens. To go wireless, tap No cable? then Copy without cable, and open the notification that appears on the old phone.
- If the old phone is unavailable, choose the option for when you can’t use it, sign in to your Google account and pick the backup, checking its device name and date.
- Sign in to your Google account when asked and confirm with your old phone’s screen lock if prompted. This is how Google unlocks your encrypted backup.
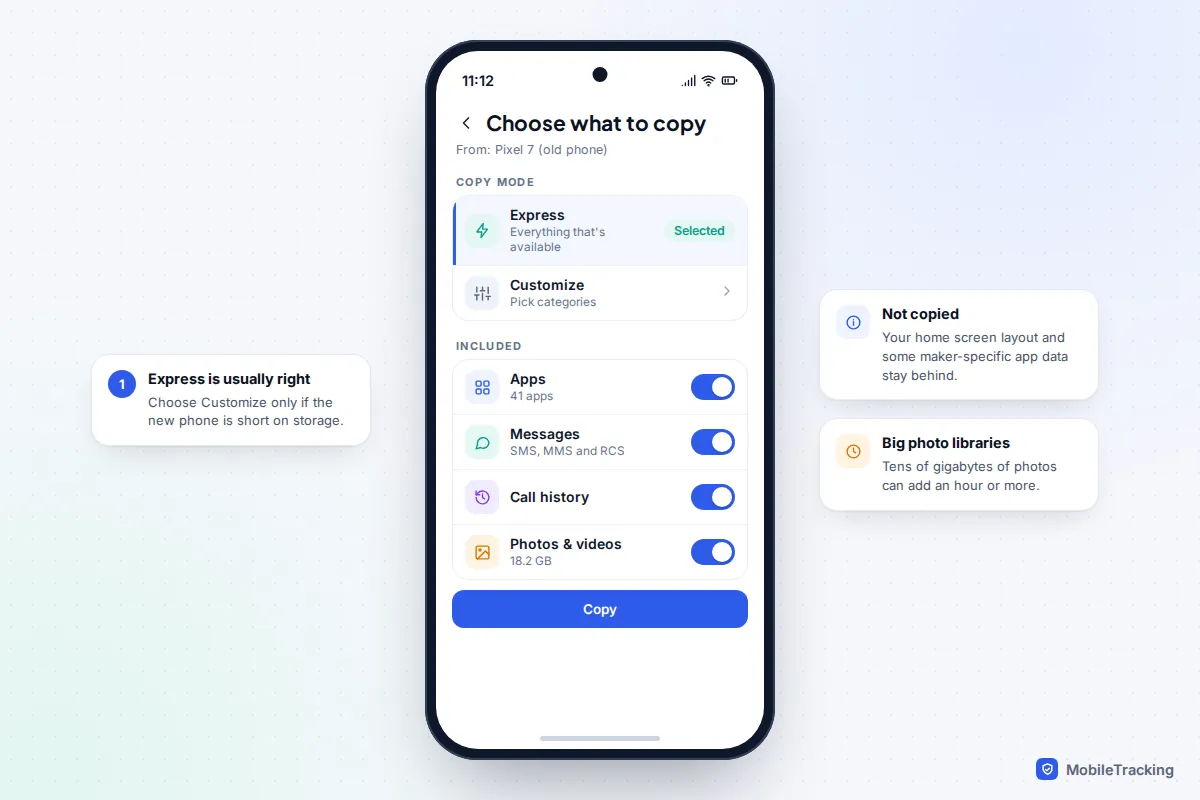
- Choose what to copy. Google’s wireless flow offers Express (everything) or Customize; leave everything ticked unless storage is tight.
- Set up the screen lock and fingerprint or face unlock, then finish setup while apps download in the background.
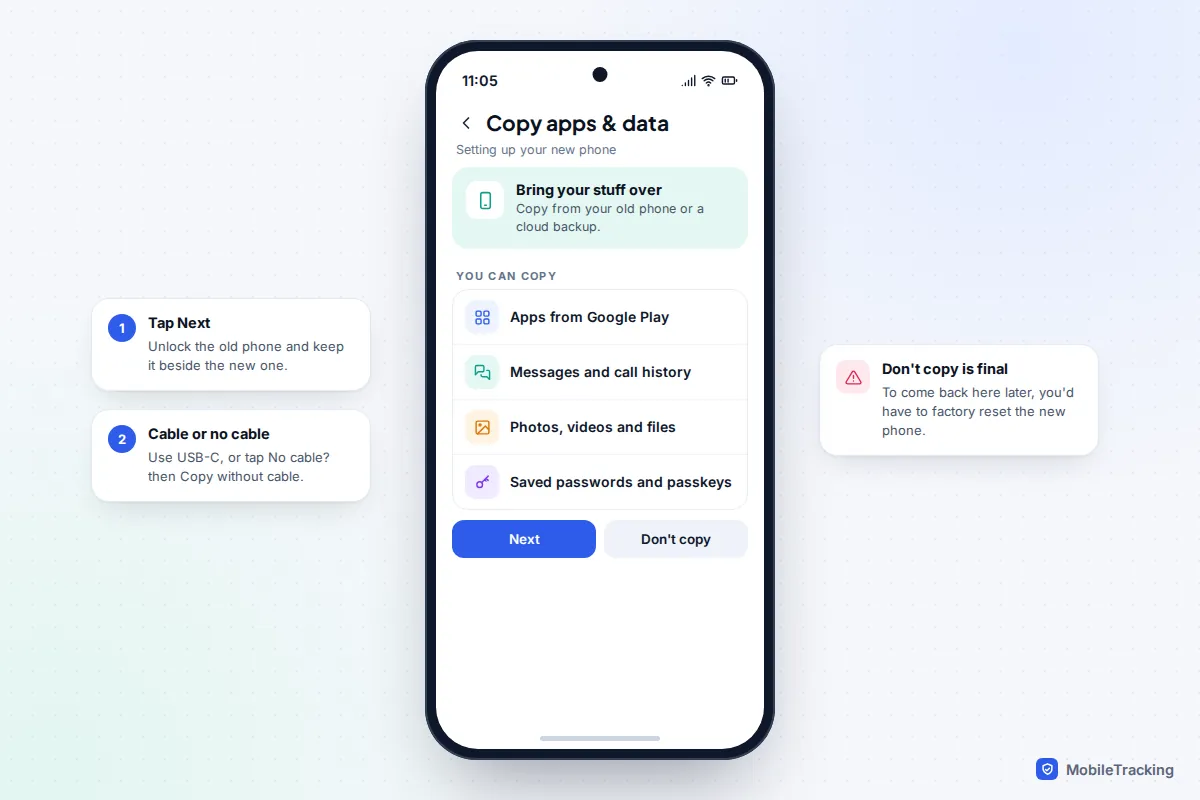
According to Google’s Pixel transfer guide, copying from another Android brings contacts, calendar events, texts, photos and videos, files, call history, Wi-Fi details, apps from Google Play and WhatsApp chat history, plus passwords and passkeys saved in Google Password Manager. It does not bring your home screen layout, and some manufacturer-specific app data stays behind. If you skipped the step, Google says Pixel 9 and later phones can still copy from an old phone after setup using its Android Switch tool; search Settings for “Android Switch”.
Samsung Galaxy: Smart Switch
Galaxy phones use Samsung’s Smart Switch for the copy. During setup it appears as the copy step; afterwards you can run it from Settings › Accounts and backup › Bring data from old device, so a Galaxy is more forgiving than a Pixel if you skipped it.
- On the new Galaxy, choose Receive on this phone (during setup, you are already on this screen), then Galaxy/Android.
- Choose Wireless or Cable. For wireless, install or open Smart Switch on the old phone and tap Send from this phone.
- Pick Everything, Just accounts, calls, contacts, and messages, or Custom, then tap Transfer.
- Keep both phones close and charging until the new one reports the transfer is done.
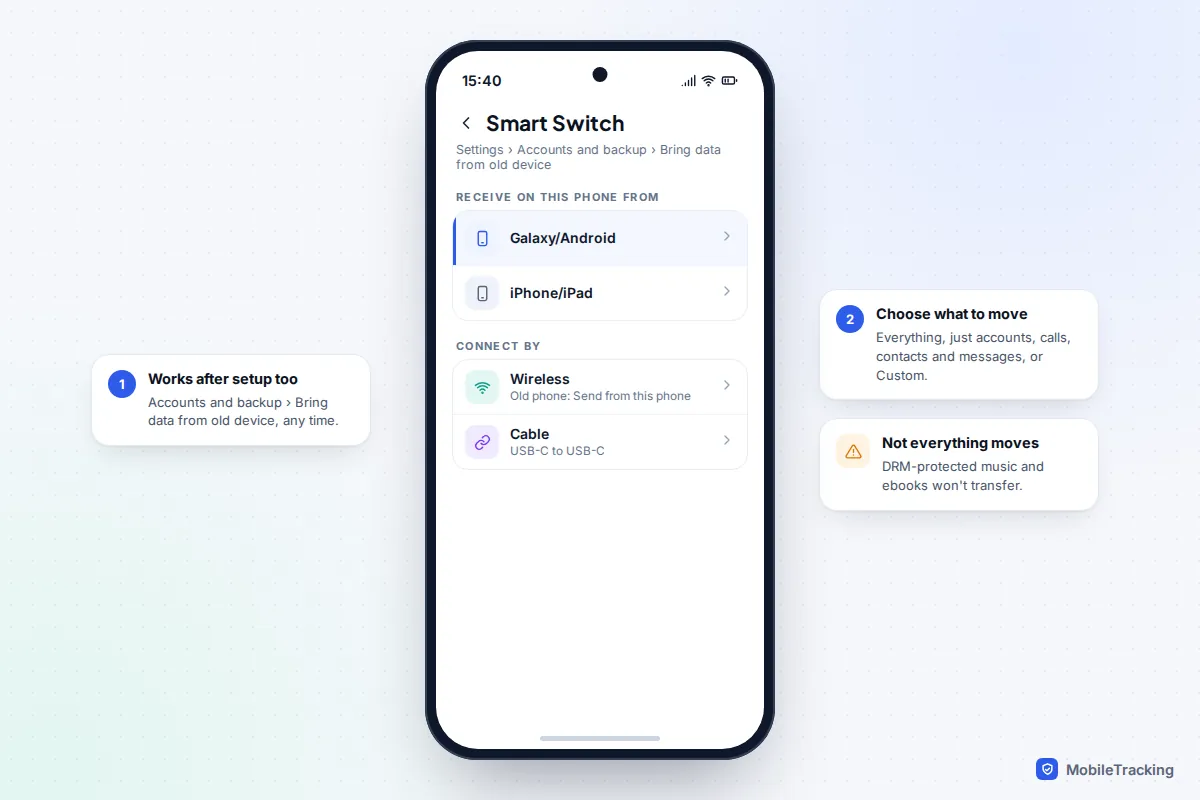
Samsung says Smart Switch moves contacts, calendar events, messages, photos, videos, music, documents, call logs and your app list, though DRM-protected content won’t transfer. Galaxy phones can also restore a Samsung Cloud backup from Settings › [your name] › Samsung Cloud › Restore data at any time, not just during setup.
Move your eSIM
An eSIM does not travel inside a backup, but modern Android phones can move it directly. On a Pixel, Google says both phones need Android 12 or later, current Google Play services and a screen lock, and the transfer is usually offered during setup with the old phone nearby: select the SIM, tap Transfer, then Activate. After setup, go to Settings › Network & internet › SIMs › Add SIM › Transfer SIM from another device.
On a Galaxy, use Settings › Connections › SIM manager › Add eSIM and choose the option to transfer from another phone. The new phone shows a QR code, the old one scans it, you confirm the number, and the eSIM moves across. Once it does, the old phone loses service on that number.
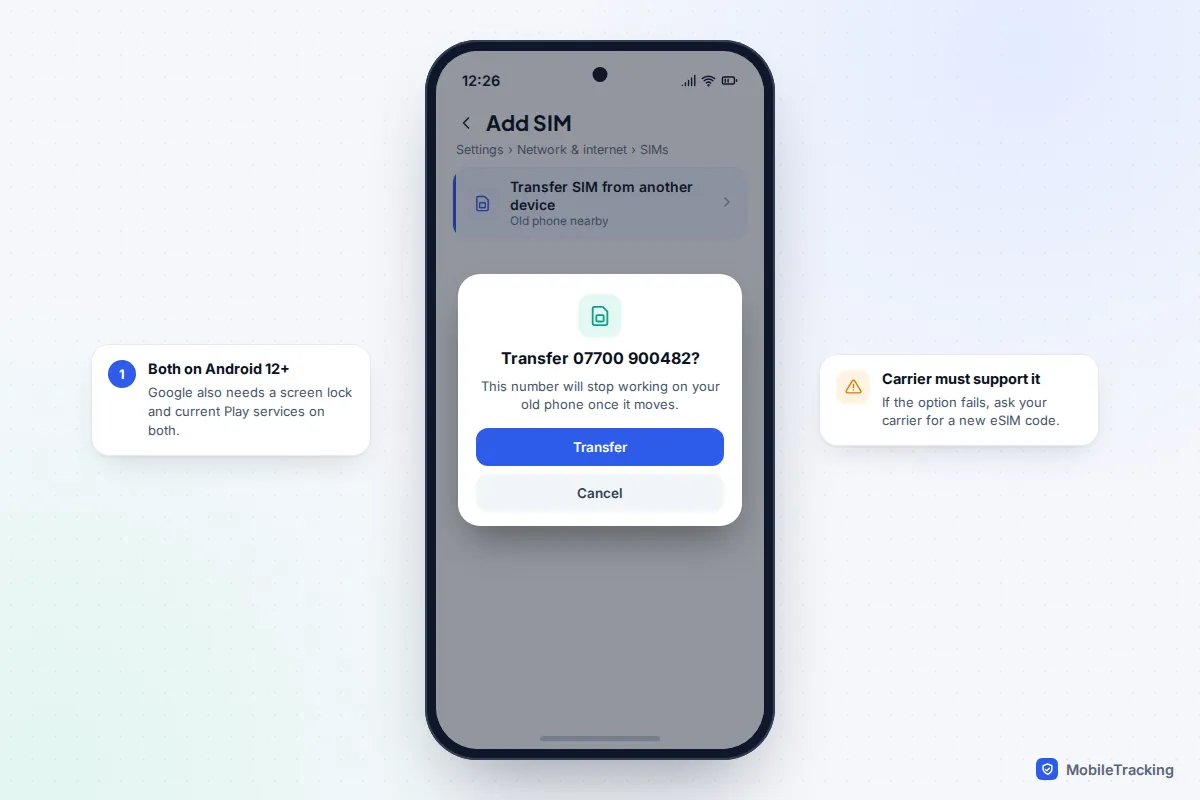
Not every carrier supports direct transfer. If it fails, contact your carrier for a new eSIM QR code, and have your account PIN or security details ready, since issuing an eSIM is also what SIM-swap fraudsters try to trick carriers into doing. For more, see how to use an eSIM.
What Google’s backup includes, and what it doesn’t
The table below is based on Google’s own list. The gaps matter more than the ticks.
| Data | In Google’s backup? | Notes |
|---|---|---|
| Apps and app data | Yes | Apps from Google Play; some apps opt out of data backup |
| SMS, MMS and call history | Yes | RCS chats are backed up through Google Messages |
| Contacts and device settings | Yes | Contacts saved to your Google account sync anyway |
| Photos and videos | Via Google Photos | Only if Photos backup was on and finished |
| Passwords and passkeys | Via Google Password Manager | Synced to your account, not stored in the phone backup |
| WhatsApp and Signal | No | Each app has its own backup or transfer |
| Authenticator codes | Only if the app syncs | Check before resetting the old phone |
WhatsApp’s chat backup lives in your Google account but is separate from the phone backup, and it now counts towards your Google storage. With the old phone in hand, the simplest route is WhatsApp’s own Settings › Chats › Transfer chats, which moves your history by QR code without a cloud backup. Otherwise, verify the same number on the new phone and tap Restore when WhatsApp finds your backup. See backing up WhatsApp chats for the settings.
Signal
Signal’s messages never enter Google’s backup. When you register on the new phone, Signal offers to transfer from your old phone directly, or to restore from Signal Secure Backups using your 64-character recovery key. Without either, your history starts empty.
Two-factor codes
If Google Authenticator is signed in to your Google account, your codes sync to the new phone automatically. If not, use Transfer accounts › Export accounts on the old phone and scan the QR code with the new one. Other authenticator apps have their own backup or export options. Do not reset the old phone until you have tested a sign-in on the new one.
After setup: a checklist
Give the new phone a night on Wi-Fi and power; Google says a restore can take up to 24 hours to finish fully. Then work through these before the old phone goes anywhere.
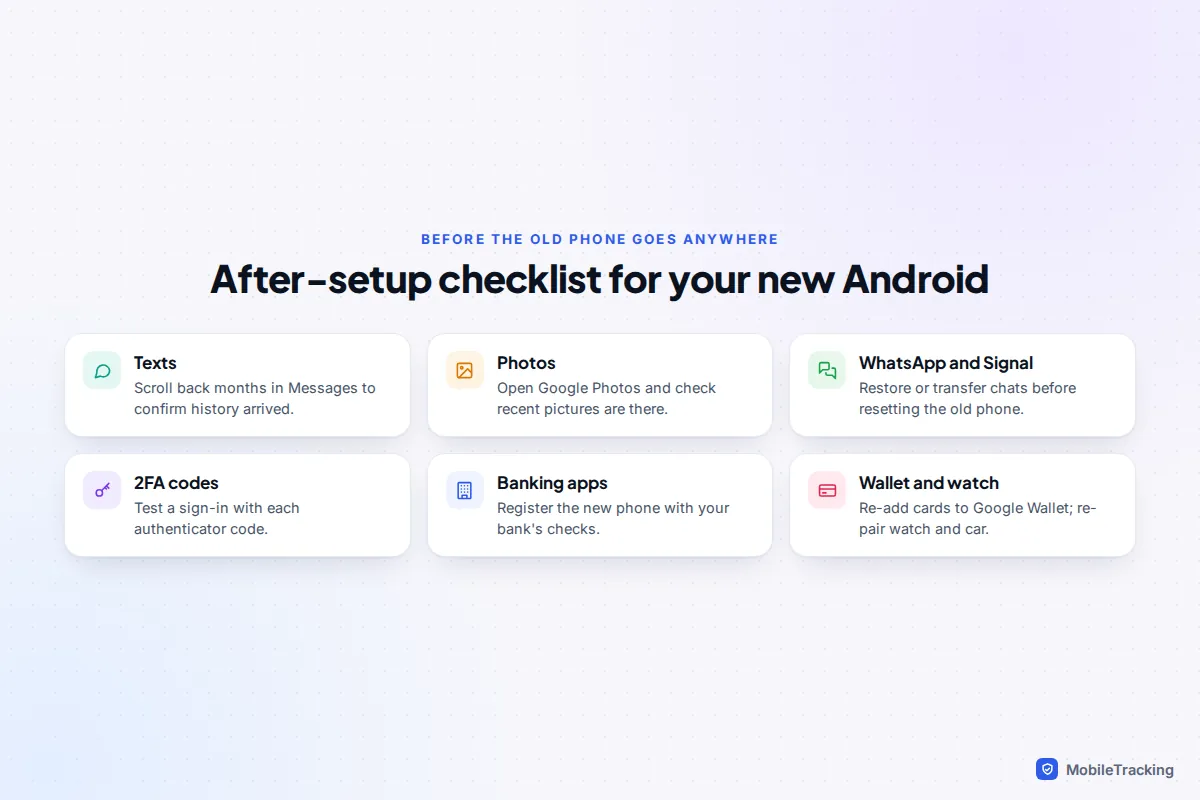
- Open Messages and scroll back a few months to confirm your texts arrived.
- Check the Play Store’s Manage apps & device page for apps that didn’t reinstall, especially ones installed outside the Play Store.
- Register banking apps again; most treat a new phone as a new device and ask for extra checks.
- Add payment cards to Google Wallet again, and re-pair your watch, earbuds and car.
- Rebuild your home screen, which usually doesn’t copy between brands.
Before you sell or hand on the old phone
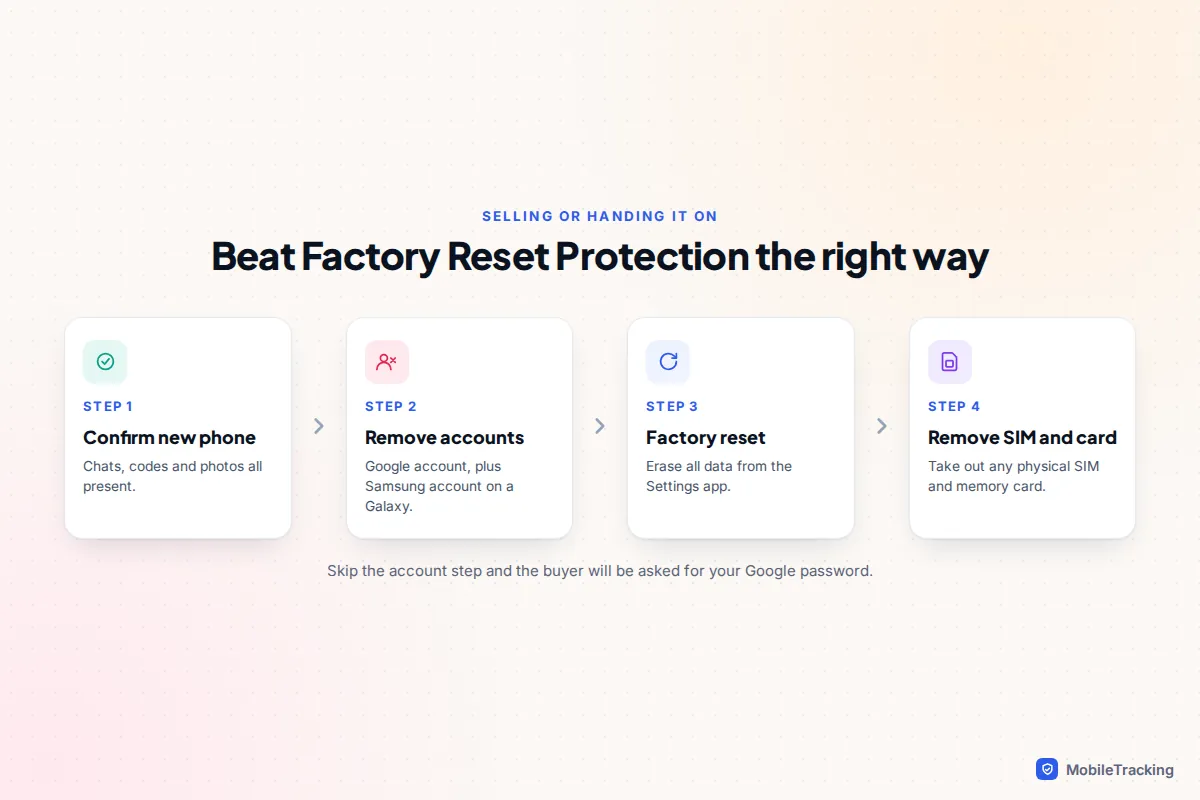
Android’s Factory Reset Protection (FRP) ties a phone to your Google account. If you reset it without removing the account, the next owner is asked for your Google password and can’t finish setup. Google’s instruction is simple: to turn protection off, remove your Google account from the device before the reset.
- Confirm the new phone has everything, including chats and authenticator codes.
- On the old phone, remove your Google account: Settings › Passwords, passkeys & accounts on a Pixel, or Settings › Accounts and backup › Manage accounts on a Samsung. On a Galaxy, remove your Samsung account too.
- Factory reset: Settings › System › Reset options › Erase all data on a Pixel, or Settings › General management › Reset › Factory data reset on a Samsung.
- Take out any physical SIM and memory card.
For the full checklist, including trade-in quirks, read how to wipe a phone before selling it. If you are restoring a phone rather than replacing it, or moving between iPhones, our broader guide to restoring a phone from a backup covers both platforms.
Frequently asked questions
I skipped the copy step. Can I restore my Google backup now?
Not fully. Google says app data, settings and messages can only be restored during setup, so the reliable fix is to factory reset the new phone and set it up again, which is painless if you have only had it a day. Pixel 9 and later can copy from an old phone after setup, and Galaxy phones can run Smart Switch at any time.
Can I restore a backup from a phone on a newer Android version?
No. Google says the new phone must be on the same Android version as the backup or a later one. If a new phone ships with an older version, finish a basic setup, install updates, then factory reset and restore.
Why can’t I see my old phone’s backup?
Usually the wrong Google account, a backup that never ran, or a backup deleted after 57 days of the old phone being unused. Check the account shown in the old phone’s backup settings.
Will my apps keep me signed in?
Many will, especially Google’s own apps. Banking, work and security-sensitive apps usually won’t: they tie sign-ins to the device on purpose, so expect to sign in or register again.
Do I need Wi-Fi for a cable transfer?
You need Wi-Fi during setup to sign in to your Google account and for apps to download from Google Play afterwards. The data from the old phone itself goes across the cable.
This guide is general information, not legal or financial advice. Read our editorial policy.